Last Saturday my husband was out of town, and a brilliant thought hit me...
"Why not build a potting bench!"
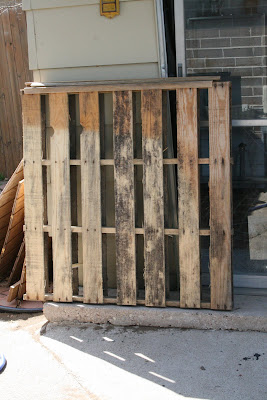
The thought actually came to me after I re-found this crate sitting in a stack of wood outside.
I am no carpenter, but I was fairly certain this was something I could tackle in a day.
Especially since I had long envisioned a potting bench on this lonely wall. I went ahead and got to work.
All I needed was one crate, cut in half with one board cut out of it. (This one was 7 boards wide and I only wanted 3 on each shelf)
Four 2x4's cut to your own desired length or height I should say.
And of course one cute little helper. (I had two helpers but the other one wasn't much on the "help" part.)
I finished it off with two pieces of "trim" for the front and a light white wash that I added some black to so that it would be more grayish.
Our lovely neighbor kids kept throwing this huge branch over the fence, so finally I decided to quite putting it back and use it instead. Some plant hangers hung upside down and screwed in with a mason screw kit worked perfect. Target had the metal buckets on their dollar spot and they were just what I was looking for to put all of my "many" gardening tools in.
Although it wasn't my dream potting bench, it was free except for the price of wood screws! There's just something about doing it yourself that gives you that extra measure of satisfaction as well. I am satisfied.
Next up, planters made out of free wood fence panels... (do you see a theme here?)
Have a safe and happy weekend!
While The Cat's Away...The Mouse Will Build A Potting Bench
0
comments
Posted by
nove
Labels:
exterior,
How to make a...,
Things I've done
The Foundry
Have you heard of them? I get an email from them every day, and I LOVE thier stuff!! Today's finds are amazing. Drool Look at at some of this stuff.
Pretty cool huh?
You can check out more by signing up today. (That's all you have to do, no promise of your firstborn or anything!)
Pretty cool huh?
You can check out more by signing up today. (That's all you have to do, no promise of your firstborn or anything!)
0
comments
Posted by
nove
Labels:
Favorite Things,
feature,
random
Painted cabinet before and after
This cabinet is a hand-me-down from the future in-laws (it's an old hospital bedside table) and it's an indispensible piece of extra storage (we currently stash all of our photo albums inside). Here it is in the living room of our old apartment, where the bright red colour totally worked:
And here it is in our new house, after a DIY paint job:
The red was too much for our new space, and it looked terrible against the big green sideboard we converted into a TV stand (which sits nearby). So last weekend I rolled on a coat of furniture primer, and covered it with two coats of Sico melamine cabinet paint in "Hint of Grey" (it's the same colour we're planning to use on our kitchen cabinets, so consider this a little preview).
Initially I painted the hardware - which was already covered in rust and old paint - with the same hint of grey, but when I was finished the whole thing was just too...white. Since I wanted to keep the original hardware - 1) because it adds character to the piece and 2) because I wasn't sure I'd actually be able to remove it - I decided to hand-paint the hardware black, using a small craft brush and a bit of acrylic paint.
Not bad, eh? The cabinet now lives near our entryway, so it's also a convenient place to drop mail, keys, etc. To keep it organized, I picked up this simple metal basket for $11 at Winner's.
I'm thinking about putting a tall, leafy green plant between the cabinet and fireplace for an added pop of colour, but for now I'm just loving this old cabinet's new look.
Update: Here it is with plant in place. Even better!
0
comments
Posted by
nove
Labels:
decorating,
DIY,
entryway,
furniture makeover,
Living Room,
Paint
Living Room Window - Finally!
So this post is very late. I have a good reason too. I wasn't happy with the pictures that I took and I wanted to take new ones, but my living room has also doubled as my sewing room for the last couple months. Alas, no new photos. Please except these anyway...
You can see what my living room used to look like here.
My latest addition. (not the little ghost) This unfortunately won't be staying since I just redid it to sell. I can always find another frame...
I am loving all the new light that the window adds to my everyday life. Especially on days like today when it's just plain old dreary.
Hopefully at some point then I can get some better pictures! Most likely I will have changed something else by then too;-)
Congrats to Northern Cottage for winning the Ramsign Giveaway!
0
comments
Posted by
nove
Labels:
Living Room,
Things I've done
Silver-leafed picture frame
My mom came to visit this weekend, and I realized we don't own any facecloths (she brought her own). Luckily I found a set of nine facecloths - in our bathroom colours - on clearance at Winners for $6. Here they are within easy reach of our future guests, on the shelf next to our bathroom vanity:
That silver picture frame was another weekend project. On Sunday morning, it looked like this:
I had some leftover materials from my first gilding project, so I decided to give this old frame a facelift. The steps were pretty easy: I applied liquid gilding paste with a paint brush and left it to dry for 15 minutes while I washed some dishes. Then, one by one, I placed sheets of silver leaf onto the frame and gently pressed them down with my fingertips. Finally, I used a soft brush to remove any loose pieces.
Who knows, I may even stick a picture in there.
0
comments
Posted by
nove
Installing trimmable blinds
I picked up some trimmable faux wood blinds over the weekend and after hours (and hours) of measuring, cutting and hanging, finally...we have some privacy!
Here they are open...
and closed.
Open:
Closed:
Yeah, I've been playing this game all weekend haha. I love the new blinds (hence all the opening and closing), but man they were a lot of work! First I had to measure the windows and calculate how much to trim off each side of the blinds. Next, I measured and marked the blinds, and trimmed each slat individually with a pair of heavy-duty scissors. Finally, I removed the extra slats, installed the centre brackets and wall mounts, hung the blinds and installed the valances (with lots of measuring and re-measuring in between). The entire process took hours, but it was worth it. The blinds look like they were made for our oddly-sized windows and I have to admit I'm pretty proud of my handiwork.
0
comments
Posted by
nove
Labels:
decorating,
Dining Room,
DIY,
Living Room,
window treatments
The Low Down On Painting Stripes
I live in Texas. I love living in Texas.
Except...
For some reason they don't know how to have untextured walls here. Walls are textured. They just are. No questions asked.
So, have you painted stripes on textured walls? It can be a mess if you don't take one small extra step.
First of all I figured out the width I wanted to do my stripes. (Pretty simple with a little math...and a calculator)
Then I got a tape measure and starting measuring out my lines by making small marks on the wall with a pencil, then just taking my painters tape and running it from mark to mark. They aren't perfect but it sure beat the other option of taking a level and drawing lines allllll the way down each and every stripe.
Just make SURE you tape off the stripes you are going to paint!! What I mean is that when you tape off then you make sure your tape is on the outside of the stripes you are painting. So when you look at the stripes all taped up there then they will look uneven because you taped the outside of one and the inside of the next. I just made that waaay more confusing than it actually is.
After I applied my tape then I took some of the wall color paint and "sealed" the painters tape so that when I painted my stripe color then it would not leak through. This is the step that is SUPER helpful if you have textured walls. It really doesn't take long at all either.
If you are a perfectionist then this job may possibly drive you crazy, but for a gal like me that just likes to get it done....well it really wasn't too bad at all.
Go for it!
You can still enter my Ramsign Giveaway all day today!
Click HERE!
Click HERE!
0
comments
Posted by
nove
Labels:
Hobby Lobby,
Kids Rooms,
Things I've done
Painted bathroom vanity
This is the mood board I put together for our bathroom, what feels like ages ago. Of course a few things have changed since then. I purchased this super cute - but still functional - Dash & Albert rug:
I cleaned-up, painted and organized the large built-in shelves behind the bathroom door:
I also painted the oak vanity and replaced the hardware. I chose Sico melamine cabinet paint in pale grey, which actually has a green-grey hue.
In the meantime, I also painted the small built-in shelves next to the vanity in the same green-grey colour (obviously I'm still working on populating it with our things):
I cleaned-up, painted and organized the large built-in shelves behind the bathroom door:
I also painted the oak vanity and replaced the hardware. I chose Sico melamine cabinet paint in pale grey, which actually has a green-grey hue.
As you can see in my mood board, I was planning to use oil-rubbed bronze knobs - until I realized what a big job it would be to fill in the holes left by the old cabinet pulls and drill new ones for knobs. Luckily I stumbled across these oil-rubbed bronze pulls at Home Depot and immediately fell in love.
Unforunately I'm not in love with how they look against the sink faucet I picked out, so I'll be returning it for a blackened/bronze version. We're still waiting for our new vanity top to arrive - which we scored for an incredible deal because of a small, barely visible chip on the inside edge of the drain hole - and I can't wait to install it (and by "I", I mean Adam and his father haha).In the meantime, I also painted the small built-in shelves next to the vanity in the same green-grey colour (obviously I'm still working on populating it with our things):
I love these cute little jars I found at Value Village for just 70 cents each.
As you can see, there's still lots to do, but we're getting there, bit by bit. I'm still trying to figure out a colour for the walls, so don't hestiate to leave your suggestions in the comments!
0
comments
Posted by
nove
Labels:
Bathroom,
decorating,
DIY,
mood board,
Paint
Subscribe to:
Posts (Atom)