Painted brick seeks high impact art

 
While we hem and haw about picking a date to have the drywall finished, I figured I should address one easy-to-fix eyesore: the partially painted chimney that separates our kitchen from our living room. I broke out my paint brush and managed to finish it over a couple of evenings (it's a small area, but those mortar joints take forever!). Three of the chimney's four sides are now painted. I'd like to paint the kitchen side too, but Adam wants to keep it natural (my objection is that it's an orange-y 60's brick and I think painting it white will modernize and brighten up the entire kitchen).
 
The newly painted brick is the first thing you see when you walk downstairs, so it needs some art - something that will make us smile day after day. Here are some ideas that have my wheels turning - what would you do?
 
via

via

via

via

via
 

Painting an accent wall in Hannah's room

We got a quote from the drywall guy today (we've decided that we're definitely hiring out the drywall finishing), so it looks like that will happen sometime in the next couple of weeks. I know that we should just get it over with so we can move ahead with painting, but the thought of all that dust, EVERYWHERE, makes me cringe (well, more so the thought of cleaning it up). Serenity now!

Despite the long list of stair-related projects ahead, I've been daydreaming about a little update for Hannah's room (bonus: it's dust free!). Remember the sweet alphabet decal that I hung above her change table way back when?


It was great for many months, but eventually Hannah figured out how to tear the letters down (what can I say, my girl likes destructing). I think X, Y and Z were the first to go, and it's pretty much been downhill from there. And since I don't want Hannah growing up thinking the alphabet consists of less than 15 letters, I think it's time to take the whole thing down and try something new.

And while I'm at it, maybe it's time to switch out the DIY bunting flag art above her crib too?


But what to replace it with? I'm thinking about an accent wall and this triangle idea is probably the top contender right now. Also, I already own black paint and I'm reasonably confident in my ability to make a triangle stencil.

source: pinterest via the merrythought

Before I saw the triangle wall, I was pretty convinced I'd try John and Sherry's raindrop idea. Which could still be really cute, especially if I stuck to black...and maybe a slightly smaller raindrop. But black rain might also be scary, so there's that. 

source: young house love

I was really obsessed with gold polka dots a while back, and while I still think this is an awesome idea for a kid's room, it doesn't work with her room's current colour scheme.

source

Another, even easier, possibility is painting a two-toned wall. Hannah's room has high ceilings, so this would definitely work in there (just not sure if I'd like it on only one wall).

source: pinterest via
I'd probably go two-thirds or three-quarters of the way up the wall with colour, since the furniture would basically cover it up at half-way. Of course then I'd probably keep the bunting flag art and have to find something new for over the change table (this would be perfect).

Direction, please.

Rub N Buff | A Little Goes a Long Way


I've tried Rub'n Buff a few times over the years but have never used it on a consistent basis. Currently, I am totally in love with gold and brass accents in the home and thought I would pull out my old handy dandy tube of this creamy liquid gold for an accent wall I am working on in our rental.
 
 
You can purchase Rub'n Buff from just about any craft store and if you can't seem to find it in your area, you can purchase it here as well.
 
If you'll remember, I have written a few posts about our rental. You can read the most detailed one here.
If you are new to the blog you can catch up on where I have struggled being in such a small temporary home with 6 very energetic people!
 
I digress.
 
I purchased the antlers below at a local Marshall's. Just in case you were wondering they are the Storehouse brand, come in all shapes and sizes from elk antlers, to moose, to deer and everything in between and I love them.
{BTW, please forgive the horrible pics. One is from my camera phone a few days after I purchased the antlers and remembered I didn't take a before pic so I went to the store to take a pic of these. Yup, I did. Don't judge me.}
 
BEFORE
Not bad but not the finish I wanted.
 
And yes, if you run to your local Marshall's tomorrow, they will probably still have some in stock. There were tons...
 

After.
Not too shabby, eh?
 
And here is the after. Such a great transformation, don't you think?
 
I am really into exploring different ways to transform décor and furniture with gold paint and finishes.
 
Here's the next product I will be working with...have any of you ever tried it? I heard it's pretty amazing!


Can't wait to share more of my gold adventures with you! What is your decorative craving right now? Do share!


cottage country table makeover


Back in May I found a sweet little table for $15 at a little "Antique" store by my cottage.  I knew it was to be painted but I debated for awhile what colour. Eventually the table found a home in our front hall which helped me decided on what tone... Although I was initially thinking of a colour like butter yellow or even kelly green, I decided to go dark so that it didn't stand out too much in the hall or show because it's a high traffic area. The winning colour was Benjamin Moore's Mysterious.  I'm obsessed with the colour now and want to paint a wall in this. It's deep blue with a hint of purple but definitely a blue. Anyhow, there you go. My $15 table makeover. :)

Ps., And as you can see the front hall has new floor tiles as of last summer -which I have forgotten to show. (Read these for the background on that!)

P.P.S., I seriously need to do a little dust buster action on that floor.

Before & After: Painted blue dining table


It took me long enough, but the dining room table is finally finished! The colour is Behr's Dark As Night and I used Minwax's Polyacrylic finish in gloss to seal and protect it (and give it some shine, of course).


I had some trouble with the gloss finish initially. It turns out it really is a good idea to follow the directions on the can ;)


Now we just need to replace the light fixture. I think Adam and I have finally agreed on one, but I'm not quite ready to pull the trigger yet. Anyway, our focus has shifted outdoors to the patio (formerly known as our backyard mud pit) - we're in a mad rush to finish in time for Hannah's birthday!


Paint problems


Sometimes projects don't go exactly as planned. My dining table makeover is nearly finished, but I hit a snag during the last step: applying the polyacrylic finish that will protect the new paint job and give the table the glossy look I want.

I've never worked with a gloss finish before - except in spray form - so this has been a "learning" experience for me (see also: frustrating, time-consuming). I used a brush on the base, which worked really well. I tried using a brush on the top, but the brush marks were really obvious and streaky, so I decided to try using a foam roller and...bubbles galore! Not good. So last night I sanded out the bubbles and went back to the brush. It went on much better this time - maybe the insane humidity helped? - so one more coat and I think I'm done. Lesson learned: don't rush to roll.

As soon as I can snap some decent pictures of the finished table I'll post them here. I really can't believe how much the colour has transformed our dining room - even Adam has commented on how much he likes it and he never notices these things.

Happy Wednesday!

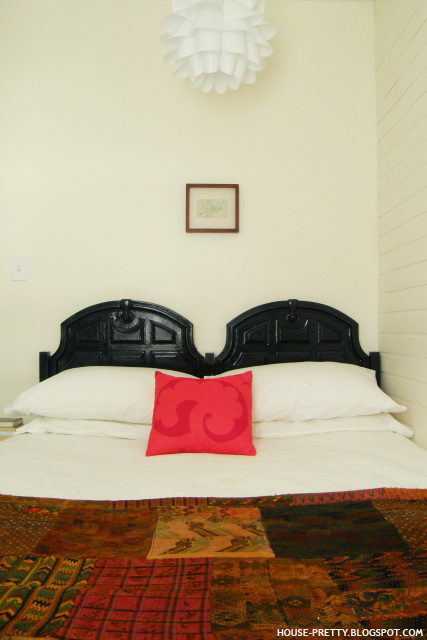
Guest room headboard: after


The guest room headboard is done! You can see the before here. The surface was a wood veneer, so I started with a coat of my favourite Zinsser oil-based primer. The paint is leftover from our shutters, garage door and foundation. The colour is a custom Manor Hall tint, but it's a very dark green - almost black.


I finished it with two coats of Rustoleum's Ultra Cover spray paint in clear gloss. I really love the gloss finish - it took the headboard from just OK to something special.


Now we just need to install new baseboard and quarter round, and we can call this room done. So close!


Guest room headboard: before

Whether Craigslist or Kijiji is more popular in your city, you've probably had the experience of spotting a great deal and rushing to send a reply (anyone else hate it when the seller insists on phone calls?), only to find out that someone's ahead of you in line. Enter crushing disappointment. Seriously, I was second-in-line for a set of matching teak chairs (at a ridiculously low price) more than two years ago and I still think about them with sadness.

It happened to me again on Tuesday, but I still emailed the seller back and asked her - without much hope - to let me know if it didn't work out. Well, the buyer never showed and yesterday morning this headboard was delivered to my door:


(WHY have we not tiled our entry yet?! I really am going to get on that.)

It's not much to look at right now, but with a little paint I think it's going to be all kinds of awesome. It will be going in our guest room, since it's about time our guests had a proper headboard. Hell, maybe we'll even be inspired to finally install the baseboard in that room.


In terms of colour, I want to go bold. Thanks to the colourful quilt on the end of the bed, I have plenty of (too many?) colours to choose from, but here's a hint as to where my head is at. Stay tuned!

Pinterest via House of Fifty Mag

Pinterest via inspiredbythis

Pinterest via elementsofstyle


Pinterest via LGN


New colour in the bathroom!

Our bathroom has a new paint colour! For the past two years, it's been white with just the tiniest hint of grey (Sico's Inkling). Hannah's nursery is actually the same colour (and I love it), but because the bathroom doesn't get any natural light, it felt kind of...dead (and still we lived with it that way for two years!). I knew I wanted to go darker and after months of taping paint chips to the walls, I finally broke out the brush and roller. Here are a couple views of the old colour (ignore the "progress" labels - I grabbed these photos from an old house tour):


And here it is now. The colour is Sico's Crosshatch. I wish I had better photos to share, but did I mention that this room doesn't get ANY natural light?


I took some time to touch up the vanity and paint the trim (I skipped this step the first two times I painted this room), but the biggest - and best - change came from painting the ceiling the same colour as the walls.


I'll admit I was nervous as the paint was going on the ceiling, but it really makes the room feel larger (and I didn't have to worry about straight ceiling lines!). I especially love the new colour against our dark-stained doors


Next up: tweaking the paper terrariums that hang above the toilet. Oh - want to see how the bathroom looked when we bought the house? Check it out here.

Another kitchen update


I've been busy painting lately. The lower kitchen cupboards are done, save for a few touch-ups. The colour is Behr's 'Paramount' - thanks to your input. Initially, we planned to add Shaker trim to the doors, but we had trouble finding the right lumber and then we got a bit lazy ;)

The hardware is already on the drawers, but I can't decide whether to go horizontal or vertical on the doors.


Adam is leaning towards vertical, but I like the horizontal look. Here's a kitchen that uses both looks - which do you prefer?

source: apartment therapy

In other kitchen news, this tile is going on the countertop:


It looks a little dull in photos, but in person the finish is super glossy (that vertical line at the bottom is actually the reflection of my iPad). The tile is a high-quality porcelain, so we get the look of natural stone without the maintenance, which is perfect for how we live (we can be slobs in the kitchen). The counter edges will be trimmed with moulding and painted the same colour as the base cabinets. Adam's dad is going to help us with the tiling and he's a pretty busy man, but I'll share an update with you as soon as I have one!

Pink + gold painted jewellery dish


I hope everyone had a great Easter weekend! I finished painting the lower cabinets in our kitchen and I'll share some photos after I install the hardware, but I love the new colour.

Today I'm sharing a quick DIY project from my closet makeover.


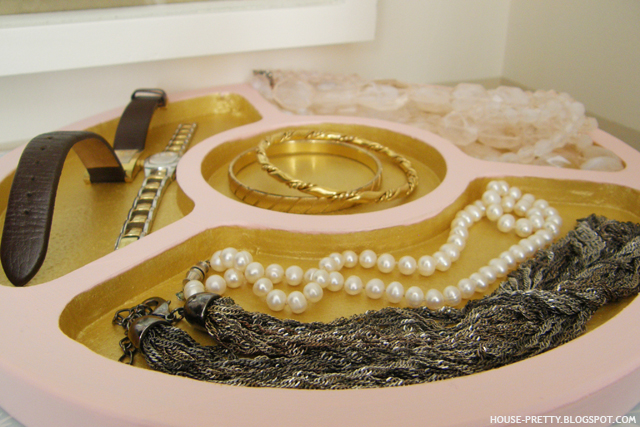
I bought this grimy wooden dish at a thrift store for $1. I honestly can't remember when I bought it, other than that it was a long time ago (like several months, maybe a year?). Anyway, I finally got around to painting it so I could use it as a jewellery catch-all. It's such a simple before and after - just some primer and a few coats of craft paint - but I love how it turned out!

DIY striped closet

On Friday, Janice's freshly-painted dressing room inspired me to do a little painting of my own.


Back when I painted our bedroom, I think I ran out of paint and was too lazy to go buy more, so I figured I'd just paint the closets later (I'm pretty sure new baseboard wasn't installed for the same reason). I've been thinking about painting my closet for ages, but Janice inspired me to finally get off my butt and do it.


On Friday night, I painted the whole closet (walls + shelves) with Behr's 'Heavy Cream' (the paint was leftover from the guest room). On Saturday morning, I measured and taped off my stripes (to keep things simple, I aligned them with the shelves along one side of the closet). I used Sico's 'Shiatsu' for the stripes (again, this was leftover paint we had in the basement).

I peeled the tape off when my paint was still wet, but it took quite a bit of paint off with it. Probably the result of not priming + fresh paint (if you're doing a similar project, I'd recommend using painter's tape designed for freshly painted surfaces). Luckily it was easy to touch-up and before long I was done (with painting, anyway).


I'm making a few more tweaks to the closet before I load all my clothes back in, so check back later this week for the 'afters'!

Updating boring slab doors with paint

I don't know what's harder to believe: that I'm sharing these embarrassing pictures of our entryway on the internet, or that I've waited two years to start fixing up this space. Better not to dwell, right?

{the blurry before}
{still lots to do, but...doors!}

The 'before' picture was taken after we painted the walls (Sico's 'Clouds of Volcanic Ash') and trim (Sico's 'Cotton Rag Paper') and removed the beat-up looking slab doors. They looked like this:


Well, I added the wood filler.

I gave both doors a quick once-over with a sanding block and applied a coat of Kilz Premium primer with a mini foam roller. After the primer was dry, I applied two light coats of Sico's furniture and cabinet paint in 'Grand Piano'. I also bought a new track and hardware set for less than $40, which was quick and easy to install (the hardest part was trimming the metal track to size with a hacksaw).

Once the doors were up, I set about cleaning the paint off the door pulls (the track and hardware set came with new pulls, but I preferred the shape of the old pulls). I should have tackled this step in my prep phase, but...um...oops. A little baking soda and hot water worked wonders. It took some scrubbing with a Q-tip, but if you soaked your hardware in baking soda and boiling water, I think you could cut out that step.


I'm waiting for new floors to add the floor guide for the doors. We've done some tile shopping (just looking) and I'm sure we'll pick something out soon; now that the doors are done, we're both motivated to finish fixing up this space.

{next up: new floors!}

Inside the closet, I did some de-cluttering and organizing. I bagged up the coats we don't wear to donate and relocated all the odds and ends that had been stuffed into the closet at one point or another (full disclosure: some of them just got stuffed into the basement storage room). I also added a wooden shoe rack, which may be the best $5 I've spent in awhile.


And for a little bit of pretty, I bought these cute chevron bins to store our hats, mitts and scarves. We each have our own bin, plus one for dog toys. They make me smile every time I open the closet doors.


You can check out my mood board for the entryway here and here's what's left on my to do list for the space:

-Paint and install hooks near the door.
-Caulk and paint the trim around the door (not sure why we didn't do this when we moved in).
-Paint and re-hang the closet doors (they're just sitting in our garage right now). I'm thinking black.
-Clean and organize the closet.
-Replace the light fixture.
-Buy or build a bench that I can sit on while putting on shoes, especially boots
-Buy a colourful rug. 
-Tile the floor and buy a new cover for the heating vent.


Total Pageviews

Blog Archive

Popular Posts