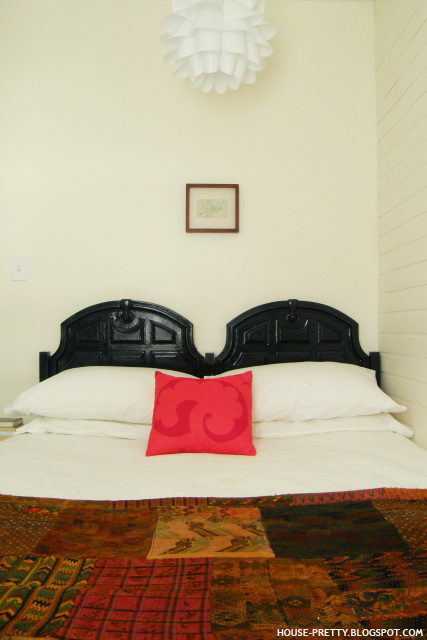
Dirty floors and new baseboards


The most apparent thing in these photos may be that I desperately need to wash my floors, but I'm going to ask you to ignore that fact (as I've done successfully so far) and focus on the new baseboards. They're finally in! Adam took care of the installation and I did the caulking, painting and room putting-back-togethering. I didn't get to the floor cleaning, but I bought a new mop, so...progress. 

Guest room headboard: after


The guest room headboard is done! You can see the before here. The surface was a wood veneer, so I started with a coat of my favourite Zinsser oil-based primer. The paint is leftover from our shutters, garage door and foundation. The colour is a custom Manor Hall tint, but it's a very dark green - almost black.


I finished it with two coats of Rustoleum's Ultra Cover spray paint in clear gloss. I really love the gloss finish - it took the headboard from just OK to something special.


Now we just need to install new baseboard and quarter round, and we can call this room done. So close!


Bed styling

Last week we talked about sofa styling, so this week I thought it would be fun to look at bed styling. There are lots of options out there, but I prefer a pared-down look (no surprises there). I secretly hate making the bed, but after years of my parents forcing me to, it's now a compulsion. Plus, who doesn't love climbing into a nicely made bed at the end of the day? That said, if styling the bed takes longer than 30 seconds, it's not going to happen every day (and my husband would probably refuse to make it that way, anyway).

Here are several inspiring beds that manage to look great and seem like they'd be pretty easy to make:
via Design Sponge

via Emily Henderson

OK, folding and positioning the throw blanket would definitely take longer than 30 seconds, but it looks really good and I would do it for my cat, who would obviously think it was the world's best napping spot.

via Emily Henderson

Same.

via Design Sponge

via A Cup of Jo

via Design Sponge

via the brick house


So, did your parents force you to make your bed every day? And how many throw pillows are too many?

Guest room headboard: before

Whether Craigslist or Kijiji is more popular in your city, you've probably had the experience of spotting a great deal and rushing to send a reply (anyone else hate it when the seller insists on phone calls?), only to find out that someone's ahead of you in line. Enter crushing disappointment. Seriously, I was second-in-line for a set of matching teak chairs (at a ridiculously low price) more than two years ago and I still think about them with sadness.

It happened to me again on Tuesday, but I still emailed the seller back and asked her - without much hope - to let me know if it didn't work out. Well, the buyer never showed and yesterday morning this headboard was delivered to my door:


(WHY have we not tiled our entry yet?! I really am going to get on that.)

It's not much to look at right now, but with a little paint I think it's going to be all kinds of awesome. It will be going in our guest room, since it's about time our guests had a proper headboard. Hell, maybe we'll even be inspired to finally install the baseboard in that room.


In terms of colour, I want to go bold. Thanks to the colourful quilt on the end of the bed, I have plenty of (too many?) colours to choose from, but here's a hint as to where my head is at. Stay tuned!

Pinterest via House of Fifty Mag

Pinterest via inspiredbythis

Pinterest via elementsofstyle


Pinterest via LGN


What do you think of gallery walls?


Do you have a gallery wall in your house? I used to have a large gallery wall in our living room, but after living with it for awhile, I decided it wasn't for me and took every last frame down. So. many. nail. holes.

I survived. And I'm much happier with how we're using that wall now.

More recently, I tried again with this mini gallery wall in our guest room. I've been living with it for awhile and  it's staying.


I prefer the mismatched frames (the frames in the living room were all white). I tried to keep the art guest-friendly (i.e. no wedding photos), but since you can see this wall from the hallway, I wanted to include photos and art that would make me smile when I walk by.

The top two frames are filled with photos from Adam's trip to Syria and Jordan several years ago. The bear print is by local artist Anna Stowe (you can find more great pieces in her Etsy shop) and the print next to it is from loadedhipspress. I painted the frame's mat to better match the artwork (I just mixed some red and brown craft paint together until I was happy with the colour) and I love how it turned out. Note to self: paint photo mats more often. Below the bear print is an old family photo and the print next to it is from Value Village (weird, I know, but I liked it). The small gold frame is filled with a photo from our trip to Arizona. The painting is by Adam's brother and below it are two silver dollars I got from my grandfather's collection when he passed away.

So what do you think? Are you pro- or anti-gallery wall?

Our almost-finished guest room

Remember the guest room I've been updating you on for months now? It's finally done! OK, it's not done done, but it's so close! We still need to install new baseboard, quarter round and door plinths, but that probably won't happen until after Christmas (we're on a slimmed-down budget while I'm on maternity leave and the room is fully functional as-is), so just picture the same gorgeous baseboard we used in our bedroom and Hannah's nursery, k?


Adam thinks the tiny art above the bed looks weird, but I love it (it's a vintage map of the Maritimes that I bought in London, of all places). I like that its size is unexpected and I think the scale plays well with the large mirror nearby.


Yes, this mirror. My aunt found it at an antique shop in Burlington, VT. For $35. The new light fixture is from Ikea. Adam installed it with help from my dad just after Hannah was born.


I love that door. We replaced all the old hollow-core doors upstairs with solid pine doors that we had cut to size, then stained, sealed and hung ourselves. The new hardwood floors were another DIY project and the wall colour is Behr's Heavy Cream. Two of the walls were textured (blech), so we decided to cover them with horizontal T + G planks. Adam took care of the installation, since I was nine months pregnant, and he did an awesome job. A few people have asked if we're planning to fill the knots and the answer is no. At least not right away. I like the rustic look of the knots, but I'm reserving the right to change my mind down the road.


The closet was missing its door when we bought the house, so I made one (and a curtain for the window, which you can get a better look at here) from a $4 tablecloth.

To give you an idea of just how far this room has come, here are a few side-by-side 'before' and 'almost afters' (can't wait to get that new baseboard installed!):


Wall colour: Heavy Cream by Behr
Alarm clock: HomeSense
Bedding: HomeSense
Quilt: Wedding gift, purchased in Guatemala
Pillow fabric: Samovaari by Marimekko, purchased from Etsy
Light fixture: Ikea KNAPPA pendant
Vintage map: purchased in London, frame purchased from Winners
Mirror: gift, purchased in Burlington, VT
Picasso print: purchased in Luzern, Switzerland
DIY dipped chair
DIY dipped planter
Table: gift, source unknown
Fancy Dress print: Yasmine Surovec, purchased from The Working Proof
Bear print: Anna Stowe
Lamp: purchased at a yard sale
Curtain and closet 'door' fabric: Atlantic Superstore

Making a bedside table out of books

The rooms in our house are all on the teeny side (side note: is teeny smaller than tiny, or is it the other way around?). The guest room is big enough for a queen-sized bed, but there's only a foot of space next to it for a side table. I started browsing through Kijiji's selection of plant stands and somehow ended up on Pinterest (isn't that how it always goes?) looking at this picture:

source: roost
This could be my favourite thing about Pinterest. Or maybe just the Internet in general. How you can be looking for one thing, but end up finding something else entirely. And usually it's something you were looking for a month ago and then forgot about. Or is it just me?

Anyway, I was looking for above-the-bed art ideas, when I spotted the books in this picture. On the floor. Next to the bed. I think you know where I'm going.


Turning stacks of books into furniture is nothing new, but I've always dismissed the idea as kind of silly. I mean, wouldn't you rather read your books? But then we started running out of room on our bookshelves and Adam's parents made him take back his childhood collection of Stephen King novels :) Suddenly it seemed like a good way to put those books to use, instead of letting them sit around in boxes. And truthfully, I love how it looks. I'll let you know how long it takes before someone accidentally knocks it over.


Yet another guest room update

Last time you saw the guest room, the bedding situation looked like this:


Pretty whomp whomp. Luckily you guys offered some great suggestions to improve it - like adding some colourful throw pillows or a bolster - and after doing some research on Pinterest (that's what I'm calling it now), I made a few other changes too.


I brought in the white coverlet from our bedroom (now that we have a new duvet cover) and moved the quilt to the foot of the bed. I find it stands out more this way. I also lowered the headboard a few inches and made a throw pillow using some Marimekko fabric I've had for years (proof that hoarding fabric has its upsides).


Oh, and I decided to nix the mirror above the bed (I actually sold it on Kijiji during this week's mini-purge). My aunt found a gorgeous vintage mirror for me at a Vermont antique shop and my mom is bringing it back for me. But it's not going above the bed. I've got another spot picked out for it and something else planned for the wall above the bed. More on that when I actually get around to it :)

Have a great weekend!

P.S. Remember my hint involving chalkboard paint earlier this week? Check back next week for the reveal!

Turn a tablecloth into window treatments


Fall is officially here, which means lots of rain in Halifax. I happen to love a good rainy day, except when I'm trying to photograph my latest DIY project :)

I was in the home section of my local Superstore last week (I think it's Loblaws in Ontario), when I spotted white cotton tablecloths on sale for less than $5 each. I scooped two up, thinking they'd be perfect as curtains in the guest room. Turning one into a "door" for the closet was easy. I opened up one of the seams to slide a tension rod through and, after a quick wash and dry, I lucked out and it was the perfect length for my opening - no sewing required.

{we still need to install baseboard and door plinths}

I'm thinking about adding a small piece of trim along the top of the opening to hide the tension rod, but we'll see.


Inside the closet, some inexpensive hangers from Winners hold my fabric, a plastic bin holds wrapping paper, and another stores gift bags, tissue paper and other gift wrapping supplies. On the shelf, there's room for a couple small boxes of craft supplies, my iron and a sewing machine. The table next to the closet doubles as my sewing table and the top drawer holds all my sewing supplies.


Here's what the table might look when we have guests (I threw a few things together for photos, but who knows how long it will stay this way). I got the glass lamp at a yard sale for $5 and the art is actually a framed postcard from a friend. The clock is from Winner's and the white bowl and plant are both from Superstore (the plant needs to be transplanted, so I haven't removed the care instructions yet).


I thought the bowl would be a convenient spot for guests to empty their pockets at the end of the day and every room needs a clock (just need to add batteries so it actually works haha).

But back to those cheapy tablecloths. The curtain for the window took a little more time and required actual sewing (although you could easily turn it into a no-sew project with hem tape). I basically hemmed a panel to fit my window and sewed a channel for my tension rod. Then I cut four lengths of grosgrain ribbon and sewed them to the top of my panel so the curtain can be tied up during the day and easily lowered at night by undoing the ribbons.


I love how it turned out! You could easily complete this project in 30-minutes, provided you're not trying to juggle DIY, caring for a newborn, feeding yourself and keeping your house halfway decent (yeah, it took me a lot longer).

Around the house

I've ticked a bunch of things off my to-do list lately, although none are particularly blog-worthy. Since this blog is essentially my online diary of all things house-related, I thought I'd post a few snapshots of what I've been up to lately.


I finally got around to touching up the paint job on our dining room table. The sealer I used on the tabletop the first time around yellowed over time, not to mention the inevitable marks, scuffs and scratches that come with a well-loved table. I lightly sanded the top and applied a couple fresh coats of paint, but I still need to seal it. If you know of a sealer that won't yellow, please share in the comments!


In the guest room. I finished painting the window and door trim (we still need to install new baseboards and quarter round), spraypainted the window latch ORB and added pulls (the same ones I used on the nursery window). I also finished painting the closet. It's still not much to look at (not that closets usually are), but I have plans to organize and store all my fabric, craft and gift wrapping supplies here. I bought fabric to sew a "door" for the closet and a curtain for the window, which I'll hopefully get around to this week or next.


Speaking of closets, mine is officially de-cluttered! I was able to donate two garbage bags stuffed full of clothing and I still have plenty to wear (not that any of it fits me right now). Forcing myself to let go of clothing that I didn't actually wear, but kept because it was "nice", was key. I also packed away most of my summer and maternity clothes. I bought some linen baskets to hold my jeans, skirts, shirts and sweaters - basically anything that doesn't need to be hung. The basket at the bottom is my new laundry hamper. I still need to paint or wallpaper the closet and I have some fun plans to add jewlery and bag storage, but this was a HUGE first step.

Last but not least, I've been working on getting Adam's studio ready for a new year of teaching. We decided to go for the layered rugs and I've been slowly collecting Kijiji finds. The trick is finding something we both like without spending lots of money. The room's a teaching studio and rehearsal space for Adam's band, so I can't worry about people tracking in dirt, dragging heavy equipment around, or spilling food and drink. It's all going to happen. I love how the rugs we've found so far (3) instantly cozy up the space.

I also finally got around to painting the window and a few other touch-ups. I painted a black "frame" around the mirror (re-used from our bathroom) and we added some greenery. I also fixed up and hung a white board I found at Value Village (not pictured) and ordered a little something so we can display all of Adam's show posters. Can't wait for it to arrive!

Total Pageviews

Blog Archive

Popular Posts