Our bed has a new pillow and I want a new sewing machine


Last night after I put Hannah to bed, I decided to fix a tear in the seam of one of my sweaters. I realized it was really a job for the sewing machine, so of course I thought, 'hey - if I'm going to go to the trouble of breaking out the sewing machine, I might as well sew that throw pillow for our bed'. Yeah, that throw pillow that required sewing in a zipper - only the second one I've ever done.


The sweater was an easy fix, but the pillow was a major pain in the you-know-what. My sewing machine (actually my mom's) randomly loses bobbin tension and I can't figure out why. Each new project requires plenty of of wasted thread, finger crossing and silent prayers to the gods. It may have taken me at least twice the time, but the pillow is done (and the zipper works).


Our cat, Henry Rollins (he looks cute, but he can be vicious), approves. The fabric is Marrakesh Firefly Ikat and it's even more gorgeous in person (like, in the picture above, I'm just as likely to pet the fabric as the cat).

 
You may remember that I already sewed two throw pillows for the bed using this fabric, but I later swiped the forms for our couch. I'm digging the simplified look (I did something similar in the guest room and I still love it), but it kind of breaks my heart that those beautiful slipcovers are stuck in a closet. Maybe I should host a giveaway?

Sewing in a zipper


Remember my DIY gold chair? It quickly earned a permanent spot in our living room...and Adam has been complaining about it ever since. Like my inspiration, it didn't have a back seat cushion, which looked great but was admittedly quite uncomfortable. I bought a down-filled bed pillow (queen-sized) and one yard of Robert Kaufman fabric and set out to appease Adam make a cushion.

Since the back of the pillow would be visible through the chair, I knew I couldn't get away with my go-to envelope pillow. I would have to sew a zipper. Dun dun duuun! As you can see in the photo above, it didn't turn out perfectly (why didn't I use white thread?!), but it works. And you know what else? When you break it down into steps, it's actually quite easy to do!

If you're ready to conquer your fear of zippers, check out this tutorial (I found this one helpful too). And since every sewing machine is a little different, you may want to check out your machine's manual too (mine has a short section on how to use the zipper foot that I found helpful, especially since it works a bit differently than what the tutorials showed).

So, conquer any sewing fears lately? Ever lose a form-versus-function argument with your s.o.?

DIY handkerchief-style curtain


Last week I showed you the progress we've made in the kitchen so far, but I left out the new curtain I made for our kitchen window. I pinned this image of handkerchief-style curtains ages ago, thinking that I would like to make something similar for our kitchen someday. Well, someday is here and I love how it turned out.


It lets us soak up every last bit of sunlight during the day and gives us just enough privacy at night. Plus, such a simple, casual curtain will contrast nicely with some of the modern touches we have planned for the room - like new hardware for the lower cabinets and a new faucet.

To make your own handkerchief-style curtain, measure your window, then cut your fabric to size and sew a seam on all four sides. Add grommets for hanging. Install hooks in your window's trim (I drilled pilot holes to prevent the wood from cracking) and you're done!


I'd never used grommets before, but it turns out they're super easy to work with. Here's the how-to if you're interested:

  1. Buy a package of grommets with tool
  2. Each grommet consists of a longer eyelet and a shorter eyelet. Make sure you have one of each.
  3. Mark the area where you want to attach your grommet to go and make a small hole (I used scissors). Place the longer eyelet under your fabric (right side down) and work it through the hole.
  4. Place the shorter eyelet over the longer eyelet.
  5. Place your tool over both eyelets and hammer.
  6. Sit back and admire your handiwork.

Now to find another project involving grommets...

DIY chevron stool (+ an easy drawstring laundry bag)


 Ottomans are great pieces to own because of their versatility, but cute ones are usually pretty pricey. Luckily, you can customize an inexpensive faux leather ottoman (I've seen them for as little as $20, brand new) easily and affordably with a DIY slipcover. I found this ugly, but sturdy ottoman a couple years ago at Value Village for $10:


It's had a couple of different looks since I bought it (another reason I love slipcovers) and recently I decided to move it into Hannah's nursery. I already owned a blue chevron fabric that suited Hannah's room, so I created a pattern by tracing the ottoman's shape onto some wrapping paper. I made one piece for the top and another long piece for the sides by rolling the ottoman along my paper and tracing as I went. Then I just pinned my pattern to my fabric and cut around it.

I also decided to try making my own piping for the first time. I followed this tutorial and if you can sew a straight line, you're ready to make your own piping. I shouldn't have waited this long to try, but I had convinced myself that it would be really hard (definitely not true). Anyway, once my piping was done I pinned and sewed it to the top piece, then pinned and sewed that to the side piece. The last step is sewing the ends of the side piece together and hemming the bottom.


Now I have a nice low seat when Hannah's hanging out on her activity mat, or a place to put my feet up when Hannah and I are sitting in her rocker, or a spot to keep Hannah's favourite books within easy reach.


While I had a sewing machine (I've had to borrow my mom's since mine bit the dust), I also made a quick and easy laundry bag. Hannah's room is quite small, so I wanted something that I could hang on the hooks behind the door - still within easy reach of the changing table. You can find a detailed tutorial here, but the condensed version is that I cut out four rectangles (two from my liner fabric and two from my outer fabric), stitched them together on three sides, hemmed the top and fed my string through the hem with a large safety pin. Super easy, looks great and now we have a place to stash Hannah's dirty laundry without using up valuable floor space!


Turn a tablecloth into window treatments


Fall is officially here, which means lots of rain in Halifax. I happen to love a good rainy day, except when I'm trying to photograph my latest DIY project :)

I was in the home section of my local Superstore last week (I think it's Loblaws in Ontario), when I spotted white cotton tablecloths on sale for less than $5 each. I scooped two up, thinking they'd be perfect as curtains in the guest room. Turning one into a "door" for the closet was easy. I opened up one of the seams to slide a tension rod through and, after a quick wash and dry, I lucked out and it was the perfect length for my opening - no sewing required.

{we still need to install baseboard and door plinths}

I'm thinking about adding a small piece of trim along the top of the opening to hide the tension rod, but we'll see.


Inside the closet, some inexpensive hangers from Winners hold my fabric, a plastic bin holds wrapping paper, and another stores gift bags, tissue paper and other gift wrapping supplies. On the shelf, there's room for a couple small boxes of craft supplies, my iron and a sewing machine. The table next to the closet doubles as my sewing table and the top drawer holds all my sewing supplies.


Here's what the table might look when we have guests (I threw a few things together for photos, but who knows how long it will stay this way). I got the glass lamp at a yard sale for $5 and the art is actually a framed postcard from a friend. The clock is from Winner's and the white bowl and plant are both from Superstore (the plant needs to be transplanted, so I haven't removed the care instructions yet).


I thought the bowl would be a convenient spot for guests to empty their pockets at the end of the day and every room needs a clock (just need to add batteries so it actually works haha).

But back to those cheapy tablecloths. The curtain for the window took a little more time and required actual sewing (although you could easily turn it into a no-sew project with hem tape). I basically hemmed a panel to fit my window and sewed a channel for my tension rod. Then I cut four lengths of grosgrain ribbon and sewed them to the top of my panel so the curtain can be tied up during the day and easily lowered at night by undoing the ribbons.


I love how it turned out! You could easily complete this project in 30-minutes, provided you're not trying to juggle DIY, caring for a newborn, feeding yourself and keeping your house halfway decent (yeah, it took me a lot longer).

Organizing your sewing supplies

Recently I volunteered to take on a few sewing projects for family and friends. Coupled with my own sewing projects, it basically meant that we couldn't eat dinner without clearing the dining room table of fabric and thread first. And if that was bad, my sewing basket was even worse:

{try finding a spare bobbin in there}
Then I remembered the small desk Adam's parents gave us a while ago, currently sitting unused in our "guest room" (I'm using quotation marks because it's actually just a room filled with tools and other random stuff at the moment). When the guest room is actually a guest room, this small desk will make a perfect sewing table (and I can easily stash my sewing machine in the closet when we have guests).

The desk has one large drawer that is basically the same size as the tabletop. While I was cleaning it out to make room for my sewing stuff, I found a package of paper placemats I bought at Homesense ages ago - on clearance for $3! I chose one of the four designs and used some spray adhesive and an exacto knife to cover the bottom of the drawer.

{before}

{after}

I used some dishes I found in a box in the "guest room" to organize my sewing supplies (yes, my collection of buttons is out of control - I picked through them after I took this picture and purged at least half).

{everything in its right place}
The next step (after finishing the room of course) will be turning the closet into a functional storage space. I'd love to hang my fabric pieces, and a few boxes or baskets could store things like craft paints, glue, punches, mat cutting supplies, etc.

via

I also need a place to store gift bags and wrapping paper and I love this idea from Brooklyn Limestone.


via


The closet will have a curtain panel for a door, so I'll have to make use of a wall inside the closet instead.

Where do you store your craft and sewing supplies? Any suggestions?

How to make any pair of curtains longer

Remember these curtains?

{pretty curtains, but not taking advantage of the room's tall ceilings}

They were the perfect length for the dining room in our old apartment, but too short for our new home's high ceilings. When we decided to turn this room into a nursery, I really wanted to keep the curtains, but I also wanted to take full advantage of the room's height. I decided to try adding some length to each panel with a coordinating fabric (after all, if it didn't work out I'd just be back where I started: shopping for a new pair of longer curtains).

I found the perfect fabric at Fabricville - on sale for $2/metre with my membership card. It comes across as plain white in photos, but it actually has a very subtle texture and barely-there, cream-coloured vertical stripes in real life. In person, it helps tie in the curtains' creamy background with the bright whites I'm using in other parts of the room.

{v2.0}

Since I was feeling thrifty with my $2 curtain update, I decided to forgo a new curtain rod and spraypainted the existing one black instead. Thinking about lengthening your own curtains? Read on for the how-to...

The trickiest part is figuring out where to insert your new fabric. I measured the distance from the ceiling to the floor (minus a couple of inches, since I planned to hang my curtain rod 2" from the ceiling), then subtracted the length of my existing panels to figure out how much length I needed to add. Instead of just adding fabric to the bottoms (which I worried would look like too obvious), I decided to insert new panels. I thought it would look best if my new panel was the same height as the section below it, leaving one longer section above:


{the plan}


I measured up 19" from the bottom of my existing panels (adding an extra half inch for my seam) and cut. No turning back now.

{step 1: cut your existing panels}
Next, I cut panels from my new fabric, adding a half inch all around for my seams (the dotted lines = seams).

{step 2: cut panels from your new fabric}
Now the easy - but also tedious - part: pinning and ironing your seams. I pinned and ironed the seams on each piece first, then pinned my pieces together. This way you can make sure all your edges line up and make adjustments if needed. Finally, sew it all together (I recommend sewing your vertical seams first, followed by your horizontal seams).

{steps 3&4: attach your panels and sew along seams}

{the finished product}

I love how they turned out and I especially love that for $2 and an hour of my time, I was able to reuse a perfectly good pair of curtains instead of buying new ones!

And in case you're wondering what's up next for the nursery, it involves this blank wall...


DIY vintage baby blanket


Like many of you (I assume, I hope), I 'pin' projects and other DIY inspiration to my Pinterest boards with the best of intentions, only to forget about them later. This time I even bought some of the necessary supplies, then let them sit in a bag next to my dining room table for a couple of months. Oops.

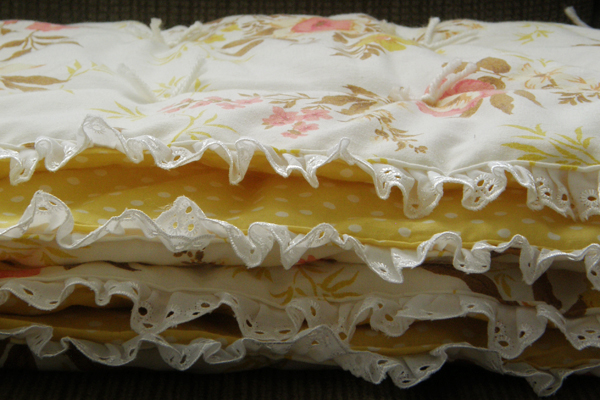
I first spotted the idea HERE and immediately knew I wanted to DIY my own version - I just needed to find the perfect vintage floral fabric. Weeks Months went by until I found it: a floral bedsheet from Value Village. Then, over the weekend, I bought a yellow, polka dot fabric and finally made my own vintage baby blanket.


The steps are pretty easy (Andrea's tutorial includes some great step-by-step photos if you need more detail):
  1. Cut your fabric and batting to your desired size (most tutorials I read recommended a 45" or 1 1/4-yard square).
  2. Place one layer of your fabric on top of your batting (right-side facing out), fold over the edges and pin to create a 1/2-inch seam. I found it helpful to then iron the edges to define my seam.
  3. Place your second layer of fabric on top of the batting (again, right-side facing out), fold under your edges and pin around all four sides.
  4. Now that you've basically got your blanket, open each side, layer in your trim and re-pin. Then run all four sides through the sewing machine, stitching as close to the edges as possible.
  5. Finally, mark the spots for your yarn ties - mine are all 4.5" apart - with pins, thread your yarn through each pin mark, cut and knot. Check out this tutorial for the very easy how-to.

And that's it! I have a few friends who either recently had babies or are expecting, and I think this would make a great handmade gift.

A big thanks to Andrea at Strawberry Chic for the inspiration!

Linked up here

Extending your coffee table

If you've seen recent pictures of our living room, you may have noticed that our coffee table is a little small for the new layout. I knew the $10 ottoman I picked up at a thrift store ages ago would be the perfect coffee table extender - it just needed a new slipcover. Luckily I had lots of fabric leftover from my DIY chair slipcover, so last week I broke out my sewing machine and whipped up this guy.


A couple of books add some colour to an otherwise plain piece and I like how it does double-duty as a footstool or a surface to rest your snack/drink/whatever.


Now if I could just find the perfect area rug...

Envelope pillow how-to

We had a weekend of beautiful weather here in Halifax! Adam and I made our weekly trek to the Seaport Market for coffee and German pastries, got on some serious yard work (more on that later), enjoyed some deliciously-rich French food with friends at Le Coq, and took the dog for walks along the waterfront and by the heart-shaped pond at Hemlock Ravine.

And on Sunday, after planing a door frame in our basement and baking cranberry-lemon muffins (I do it all, folks), I turned my pretty new fabric into pillows for our bedroom.


I don't have the sewing skills for invisible zippers, so I went with a simple envelope pillow. Read on for the how-to, or just scroll to the bottom of this post for more pretty pillow pictures!

Envelope Pillow How-To:

1. Start by measuring your pillow insert. Cut your front piece to size, making sure to add an inch on either side for your hems. I had two, 20x21-inch down pillow inserts on hand, so I cut two, 21x22-inch panels.


To save money, I used less expensive fabric for the backs of the pillows. I was lucky to find a lovely neutral at Fabricville marked down to $4/metre!

2. To create your "envelope", you'll need to cut two back panels for each pillow. The width is the same as your front panel, but divide the insert's height in half and add two inches to each panel (4 inches for the back piece overall) for hems and overlap. Because I was making two pillows, I cut four back panels. Each panel was 21-inches wide (just like the front) and 13-inches high (22/2 = 11+2 = 13).


3. Next, pin, iron and sew the hem on your back panels.


Optional: If you're me, now realize you measured your hems incorrectly so your back panels are too short. Silently curse yourself, take a short ice cream break, then rip out all four hems, measure correctly and re-pin, re-iron and re-sew.

You should feel free to skip this step :)

4. Pin your front and back panels together and sew.


5. Step back and enjoy your good work!


Total Pageviews

Blog Archive

Popular Posts