Our Little Lee is a week and a half old already. It's amazing how quickly he has captured our hearts and made us forget that we ever wanted a little girl.
I could brag and post about him (and my other two) all day long but I'll try to spare you:-)
Let us move on...
For those of you who have yet to experience the coolness of
The Foundary then I am giving you another invite.
I seriously LOVE this place! You never know what in the world they will have, and the prices are great!
Best of all, they send you an email each day so that it's super easy to see what they have going on and you never miss out on a sale.
Do I sound like an infomercial? Unlike an infomercial, there is no cost at all to sign up, but once you sign up you can earn money every time someone excepts your invite. (You knew there had to be another reason I keep offering you these invites;-)
Check out
The Foundary!

I decided to hang my DIY'ed necklace holder above the
DIY'ed dresser in our guestroom (pics to come), so it only made sense to give our guests a place to store their watches, earrings, and other shiny things. I found this glass ashtray/candy dish at Value Village for 99 cents, and I love this vintage-looking tray (another Value Village find, for less than $2), which totally suits our guestroom's green theme.
Cute, inexpensive jewelry storage - love it!
Adam's parents gave us this old wooden dresser months ago. It's very sturdy, with good lines and cute detailing on the top drawer front. But it was scratched and worn, and in need of a DIY paint job.
I started by removing the knobs and lightly roughing up the surface with 100 grit sandpaper. Next, I rolled on a thin coat of primer and left it to dry. When the primer was dry, I rolled on two thin coats of Sico furniture paint, which I had tinted to match Pittsburgh Paints Aloe Vera (209-3). When it comes to painting furniture, remember that multiple thin coats are always better than one thick and gloopy one.
I left it to dry overnight, then replaced the hardware with some brushed nickel knobs I had lying around (when we got rid of one of the dressers in our bedroom, I actually thought to save the knobs for future use). I also took the opportunity to wax the drawer rails so our guests wouldn't have to struggle with sticky drawers.
I LOVE how this project turned out. I won't reveal how much time I spent basking in the glow of the finished product (i.e. staring at it), but the colour reminds me of pistachio ice cream (yum) and that only made it harder to look away. I'm almost jealous of my future guests...
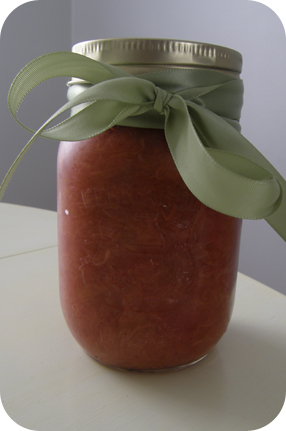
As soon as spring was up and running, Adam and I discovered a rhubarb plant growing in our front bed. I was thrilled - I love rhubarb - but I had no idea what to do with it.
Then I
discovered an easy recipe for rhubarb compote. When I got home from work on Friday, I harvested a large handful of rhubarb (after watching a
video tutorial - I'm a total nerd, what can I say?), washed it, chopped it up, and tossed it in a pot.
I added about a 1/4 cup of tightly packed brown sugar and a couple of tablespoons of water, and let the whole thing cook (covered) on low heat until the rhubarb was nice and tender (about 15 minutes).
Then all I had to do was let it cool (it stays fresh in the fridge for up to 5 days). Adam and I tried some over vanilla frozen yogurt that night and it was delicious! In a mason jar tied with a pretty ribbon, it also makes a great gift.
These tulips came from our front yard - how awesome is that?! It's the first time I've had a yard to pick flowers from, so I'm pretty excited about it. Unfortunately they've since opened and most of the petals fell off, haha.
Over the past week, I've spent most of my free time trying to whip our guest room into shape. We're not expecting any house guests until the wedding, but I figure I'll have enough to do by then, so no harm in getting started now.
Here are a couple of photos of what we started with: basic brown walls, doors that some creature used as scratching posts, ugly carpets, dingy trim, etc. You can't see all the holes in the walls and trim, but I spent a good half hour spackling and it's a
small room.
And this is what is looks like now:
Haha, yeah I've still got a lot of work to do. You're witnessing my painting strategy, also know as piling everything in the centre of the room. I've painted the walls - we repeated our
bathroom wall colour - and put a fresh coat of creamy white paint on the trim (this picture doesn't do the transformation justice), and this weekend I'm going to tackle those banged-up doors. I've also got some fun DIY projects planned for this room, so stay tuned! And as a hint, here's the inspiration photo for my colour palette:
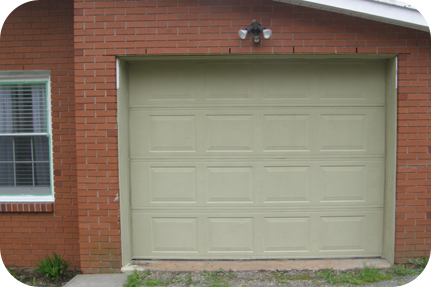
Yesterday was a holiday in Canada, and in Nova Scotia, it was the first sunny day in awhile (gotta love when the two coincide). I took full advantage of the opportunity to get rid of the hideous green paint covering our garage door, foundation and even some of the exterior trim (the old homeowners painted one corner of one of the shutters before running out of steam, or green paint). I actually started a couple of weeks ago by painting the trim of our front-facing living room windows (I used Manor Hall exterior paint in Moonlit Snow).
Is it perfect? No. But it's a huge improvement until we have the $$ to replace these windows with energy-efficient ones. Yesterday, I tackled the foundation. I used Manor Hall exterior paint in Dark As Night (the paint looks black from afar, but it has green undertones that give it a slightly warmer feel). The pressure washing we gave the house a couple of weeks ago helped too (check out the close-up of all that dirt and grime, ew).
We still need to paint the shutters and window trim (and replace the rain gutter), but it's already a huge improvement. And as you can just barely see in the picture above, we're slowly adding plants - albeit small ones, haha - to that side of the house (next weekend we're hoping to add mulch and a few more plants to fill it out). Check out my blooming rhodo - so pretty!
Finally, I painted the garage door, starting with the trim, which the old homeowners had covered in green paint. I love the contrast between the brick, white trim, and dark door - now we just need a new light fixture.
Here's a shot of the front so you can see how it's coming along. I can't wait to paint the shutters and I'm hoping to add some colour by painting the front door (I'm open to suggestions, so please share). Not bad for a weekend's work.
I am currently shifting my mind away from this...
And back to this...
We happily greeted another baby boy on Friday, May 20th at 10:48AM. He weighed 7 lbs, 8 oz and was 19 1/2 inches long.
His two older brothers are so excited and wanting to hold him every second.
Thank you for all the well wishes and thoughts!
I'll post more pictures when I can!
(By the way, if you missed it, his name is Lee Monroe)
...
The Vintage Bricoleur for winning this months We Can Do It Cheaper Recreation/Copy Party!
If you have yet to visit
their blog then be sure to stop by and see all the neat stuff they do and sell. (If you live in California then you need to see where they will be next!)
She has won the $10 gift certificate to
The Snootie Pig!(Have fun picking something out!)
Thanks for all the entries and thank you to The Snootie Pig for sponsoring!
In other news, I am taking a short (or long) leave of absence in preparation for the arrival of our new little one. Have no worry though, I will be back to let you know
what, when and how with just a few pictures I'm sure;-)
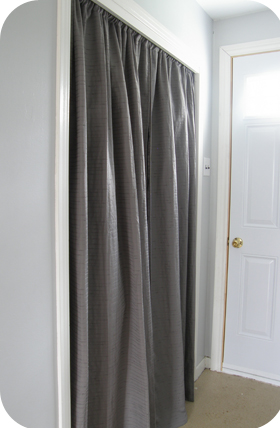
This is what our entry-way closet looked like last week. Well, technically this is what our entry-way closet looked like when I remembered to take a "before" picture, halfway through painting the shelf and trim (both were a dingy shade of white before I began).
The closet had a set of dark brown, hollow sliding doors when we moved in, but in addition to being supremely ugly, they didn't work very well, so I took them down and hung a pair of curtains (a hand-me-down from my mom) in their place as a temporary fix until we buy new doors.
After I finished painting the closet (I used the leftover paint from our bathroom vanity - Sico's Cool Grey - which
fits somewhere between the curtains and the wall colour), I cut the tabs off the tops of the curtain panels, sewed a channel to fit a curtain rod, and hemmed the panels so they wouldn't drag on the floor (extra length looks great around a window, but isn't ideal in an entry-way, obviously). The curtain hangs on an adjustable shower curtain rod, which is hidden behind a piece of trim already in place to hide the old doors' metal tracking.
And for the dog in our lives, I installed a couple of inexpensive hooks on the closet's far left side to hang/hide Maddie's leash and a drying-off towel (which, I suppose, all towels are). It doesn't make for the nicest picture, but it wouldn't make much sense to use a nice towel to dry a wet and dirty dog, now would it?
Now we just need some flooring...


.JPG)
