Turn a tablecloth into window treatments


Fall is officially here, which means lots of rain in Halifax. I happen to love a good rainy day, except when I'm trying to photograph my latest DIY project :)

I was in the home section of my local Superstore last week (I think it's Loblaws in Ontario), when I spotted white cotton tablecloths on sale for less than $5 each. I scooped two up, thinking they'd be perfect as curtains in the guest room. Turning one into a "door" for the closet was easy. I opened up one of the seams to slide a tension rod through and, after a quick wash and dry, I lucked out and it was the perfect length for my opening - no sewing required.

{we still need to install baseboard and door plinths}

I'm thinking about adding a small piece of trim along the top of the opening to hide the tension rod, but we'll see.


Inside the closet, some inexpensive hangers from Winners hold my fabric, a plastic bin holds wrapping paper, and another stores gift bags, tissue paper and other gift wrapping supplies. On the shelf, there's room for a couple small boxes of craft supplies, my iron and a sewing machine. The table next to the closet doubles as my sewing table and the top drawer holds all my sewing supplies.


Here's what the table might look when we have guests (I threw a few things together for photos, but who knows how long it will stay this way). I got the glass lamp at a yard sale for $5 and the art is actually a framed postcard from a friend. The clock is from Winner's and the white bowl and plant are both from Superstore (the plant needs to be transplanted, so I haven't removed the care instructions yet).


I thought the bowl would be a convenient spot for guests to empty their pockets at the end of the day and every room needs a clock (just need to add batteries so it actually works haha).

But back to those cheapy tablecloths. The curtain for the window took a little more time and required actual sewing (although you could easily turn it into a no-sew project with hem tape). I basically hemmed a panel to fit my window and sewed a channel for my tension rod. Then I cut four lengths of grosgrain ribbon and sewed them to the top of my panel so the curtain can be tied up during the day and easily lowered at night by undoing the ribbons.


I love how it turned out! You could easily complete this project in 30-minutes, provided you're not trying to juggle DIY, caring for a newborn, feeding yourself and keeping your house halfway decent (yeah, it took me a lot longer).

Turning curtains into doors or Things I bought at Ikea: Part 2

I spent most of the weekend working on a project that I can't wait to share with you - just as soon as I finish it. In the meantime, here's a much smaller project I checked off my list.

Much like our interior doors upstairs, the door to our basement storage room was a mess, so we chucked it. But as you can see in the photo below, we needed something to obscure the view.


Um, try to ignore the ugly stucco on the walls. It actually only covers a small area (thank goodness), so we're going to cover it up with pegboard to create a stylish storage area (why is it that simple projects get put off the longest?).

Anyway, on our trip to Boston I picked up a couple of inexpensive curtain panels at Ikea. Last week I bought a $6 tension rod and over the weekend I turned one of the curtain panels into a door.

TBC, as in, to be covered
I washed the panels first to allow for shrinkage, then measured the door opening and hemmed one panel using the iron-on hemming strip that came in the package. So easy. Unfortunately it probably means that we'll continue to put off organizing the storage room (out of sight = out of mind), but on the plus side, I can't wait to cover up that stucco.

Using curtains as temporary doors

This is what our entry-way closet looked like last week. Well, technically this is what our entry-way closet looked like when I remembered to take a "before" picture, halfway through painting the shelf and trim (both were a dingy shade of white before I began).


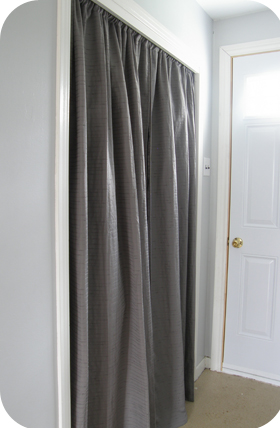
The closet had a set of dark brown, hollow sliding doors when we moved in, but in addition to being supremely ugly, they didn't work very well, so I took them down and hung a pair of curtains (a hand-me-down from my mom) in their place as a temporary fix until we buy new doors.

After I finished painting the closet (I used the leftover paint from our bathroom vanity - Sico's Cool Grey - which fits somewhere between the curtains and the wall colour), I cut the tabs off the tops of the curtain panels, sewed a channel to fit a curtain rod, and hemmed the panels so they wouldn't drag on the floor (extra length looks great around a window, but isn't ideal in an entry-way, obviously). The curtain hangs on an adjustable shower curtain rod, which is hidden behind a piece of trim already in place to hide the old doors' metal tracking.


On the shelf, I've got my DIY chalkboard storage bins.


And for the dog in our lives, I installed a couple of inexpensive hooks on the closet's far left side to hang/hide Maddie's leash and a drying-off towel (which, I suppose, all towels are). It doesn't make for the nicest picture, but it wouldn't make much sense to use a nice towel to dry a wet and dirty dog, now would it?


Now we just need some flooring...

Total Pageviews

Blog Archive

Popular Posts