Ranarp Lights from Ikea


A few weeks ago I was at Ikea looking for the Ranarp clamp light for Oscar's room, when I happened across the Ranarp work light. For some reason I felt it necessary to grab two work lights to just "try" out at home - originally intending to put them into my office. It turns out that they found a home in our bedroom.

I was unsure about the look for a few days, wondering if they looked too much like work lights, but in the end I've come to the conclusion that they are a welcomed addition of modern into a room that has a lot of "traditional". So it's a nice juxtaposition. Also, they sit on our Rast Hack - It's an Ikea side table party over here.

Now I just have to time my next Ikea visit so I can actually go on a day that they have the clamp lights in stock. Those babies are hard to get a hold of.

Guest cottage essentials...beautiful basics and luxe delights

I dream of having a little cottage in the countryside where we can retreat from the city a few weeks a year.  One day when this dream comes true, I plan to share it and rent it to other country loving city dwellers.  As much as I love renting other peoples cottages, there always seems to be one bit missing from the kitchen, bathroom or bedroom that I miss from home.  So I thought I would put together my essential list of beautiful basics and luxe extras.
Eat & drink Essentials:
  • Jars of tea bags and sugar are so welcoming, everybody wants to pop the kettle on for a cuppa when they have just arrived.  The glass jars from IKEA (top left) have a rubber seal and will keep dried goods fresh and ready to use.
  • I really don't like mismatched crockery and cutlery.  I would rather have a whole set that is clean and simple than several more expensive sets combined together.  Is this just me?
  • Guest houses often forget to include a salad or serving bowl with serving spoons, always annoying.  And they also often forget smaller bowls to serve snacks in.   Just because I am on holiday does not mean that I want to eat straight out of the packet.
  • I would also make sure the fridge contained: fresh milk, fresh eggs, a pat of butter.

All Eat & Drink Essentials are from IKEA, except the kettle and toaster which are from Appliances Online.

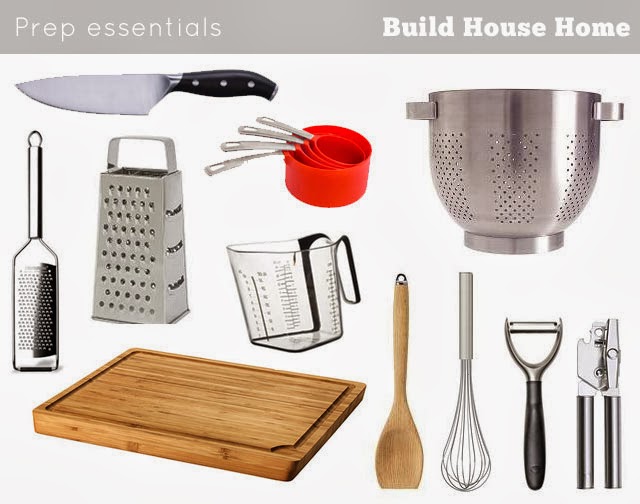
Prep essentials:

One of the joys of holiday is having time to cook and enjoy a meal with family and friends.  I almost always miss something that I think is essential from my kitchen.  My basic necessities are just that, the bare bones that I need to cook enjoyably, and holidays should be about enjoying yourself after all.

  • Prep cannot even start without a good chopping board and a sharp knife.  I almost always wish I had brought my own super sharp knives along, cutting a tomato with a blunt knife is no fun at all.
  • I am always using my microplane zester (far left).
  • The rest covers most dishes from breakfast to dinner, baking to casseroles.  
  • I should probably have included some mixing bowls too...

Every thing except the microplane available from IKEA.


Cooking essentials

  • When it comes to cooking you can't beat a good set of pots and pans.
  • I can't cook with out my tongs anymore, how did I ever turn something on the grill before, or serve pasta for that matter.  
  • You have to include an egg slice for those lazy cooked breakfasts.
  • Lots and lots and lots of clean dishtowels.  

Every thing here from IKEA.

Luxe additions: 
A good casserole pot would be a good extra addition, I do love a casserole in winter.  
A few disposable roasting pans, nobody likes cleaning up on holiday.


Luxe items you will find in my cottage's bedroom and bathroom:
  • Lovely soaps at every basin, in the shower and at the kitchen basin. (I was given my Molton Brown by The Home but you can find them online)
  • Trinket boxes to store your jewellery, watches and phones in at the bedside on on the bathroom cabinet. (Dante boxes from Country Road)  
  • A thick plush bathrobe for every guest, they don't cost much and make you feel so pampered. (Soybu Spa Robe)
  • Lots of a clean towels.  When they are frayed and marked they must go (a pet hate).
  • Hurricane lantern to create safe candle light in the bathroom or bedroom.
  • Lovely bedlinen, this selection is from Pottery Barn.  Its worth buying new sets every year to make sure your guest know they will always have a bed that is fresh and inviting.  Watch out for good deals to replenish your sets on The Home, even if its simply for your own bedroom or guest room.
Luxe items for the kitchen:

  • A good olive oil, local if possible - this one from Coriole
  • Salt and pepper, I love the packaging of these grinders from Nomu  
  • A few concentrated stock pots, these ones from Knorr are my personal favourite
  • A Nespresso machine and milk frother.  I really love my morning coffee and all people need to is bring pods of their own choice.  Love this red version, the Pixie


One day when I have a little cottage of my own, these are the essentials it will have.  Let me know if I have missed any of yours.
One day...


I like to think Ikea got the idea from me

Spotted this desk and children's work space layout in the hot off the press 2014 Ikea catalogue.
Looks a little familiar, me thinks Ikea stylists might be looking in the pages of this little blog for inspiration.  This is Ikea's directly below, scroll down to see mine or check out the original post Where Miss J & I work which I posted in March 2013. 
The workspace Miss E, Miss J and I share in the family room.  How is that for a similarity! 

Don't worry Ikea, imitation is the most sincere form of flattery.  It is possible that I saw a similar layout in a previous catalogue, but I am notching this score up to me.


new art prints in ikea frames


I took some photographs of some new prints I designed. Oscar's room comes in handy for these photoshoots thanks to amazing light and his dresser. All of the prints are framed in Ikea shadow box frames - but instead of making them shadow boxes as they are intended I've framed them with the print right up to the glass - I prefer this look for these prints.

Did you know Ikea had 50% off their picture frames this past weekend?!! I happened across the sale by chance and flipped out. (had a "start the car!!!" moment) I loaded up my car with a ton of frames and I've put it in my calendar that the sale happens around this time so maybe next year I'll be more prepared. (So do the same!)

(Ps., the Beaver and the Moose look ridiculously cute when hung together as they face one another.)
P.p.s - Happy Canada Day!

diy desk updates


I'm trying to organize and decorate my office a bit better - One thing is, I'm not overly happy with this wall of bulletin board and have considered taking it down. But taking it down would perhaps damage the wall, so I'm not sure whether to live with my design mistake or succumb to my OCD about it. Anyways, apart from the look of the office, one of the things I needed to address was organization.

A month ago I decided to make the DIY desk slightly larger. I needed more space to store orders waiting to be shipped. To give some background in how I run my shop, I use these dollar store stackable baskets to organize orders. When an order comes in, I place items in the basket. Sometimes orders have products that have different production times (stamps take 14 days to make, whereas I have gold glitter ribbon in stock) so in order to make sure things stay together an gets it's own basket. If you've ordered from me, your order has likely been in one of these baskets. It's an amazing little system that has meant that orders get shipped faster, there is less product wandering around my office and order mistakes have 99% dissapeared. Little steps that help me as my shop is shipping out more orders on a weekly basis.

How we designed this desk was was similar to how we did my desk, but it actually was a lot easier. More after the jump.
Read more »

Quickly popping in to share this .... Ikea gave our Kitchen renovation the seal of approval by dedicating an entire album to our renovation on their facebook page. Yay! If you're a new reader - check out my archives for helpful posts on the Ikea kitchen process.  Hopefully some of the posts will prove to be helpful. Anyhow, signing off for the rest of the week. Have a great weekend. xo

Ps., Love this photo above, and it seemed fitting to share it as it's one of our more popular Ikea projectsAt The Bay preview yesterday I met Samantha Pynn, who as you many of you know, inspired our Ikea bench.

Ikea Hack - Gold Frames


Happy weekend. Since I just showed you my trick of how to get the best looking gold frames, here is a post that will give you some inspiration using Ikea. First of all I love Ikea frames - they are economical and are offered in a variety of interesting sizes so you can create interesting displays on your wall. I'm regularly hacking Ikea frames. (Remember this piece?) Above is an example of my latest DIY project, turning an Ikea frame to be a gold shadow box with modern art. 

Step 1: Start with this Shadow Box Frame from Ikea


Read more »

Making Ikea cabinets look custom


I have always loved the look of crown moulding around kitchen cabinetry, especially when you're using "Big Box Store" cabinets. I think it's one of the key elements in making something out of a flat packed box look custom. (See Carol Reed's blog for inspiration on ways to make Ikea kitchens look custom) Early in the design process we accounted for having crown moulding above the cabinets.

First thing - we went with the tallest Ikea cabinets possible. After accounting for the space between the counter and bottom of the cabinets (18") we were left with enough for a 2" crown moulding. Prior to installing the crown moulding, I painted it in Benjamin Moore's Paper Mache. Because we're working with a lot of whites, it was important to match the Ikea doors.

If you're going to do the same - make a note of the fact that Benjamin Moore's Paper Mache is a perfect match for Ikea's Adel Doors. Ikea Adel doors are not white - they are a creamy tone. I fretted about this originally, but I'll tell you now that the cabinets are gorgeous and I love the tone. I think if they were any whiter they would look too white. You can see in the photos above the crown moulding against the ceiling colour (bright white). The cabinets are definitely cream. By painting the crown moulding the same colour as the doors it makes the entire upper cabinetry look built in. Best decision.

Almost there! We really have only one thing left to do.....

Ps., Thanks to Leigh-Ann for helping me figure out the paint colour for the doors! If you don't have a friend that is a part of the Benjamin Moore Design Team then do what I also did and bring an Ikea door with you to your paint store and start pulling out paint swatches to try to match. (I did this to double check that we were going with the right tone)

Ikea Adel Doors


Although we installed the cabinets last week we didn't start adding doors until a few days ago. We delayed the door installation until after I had painted the ceiling. (I wanted to eliminate the risk of getting paint splatters on the doors) So Wednesday AM I painted for three hours. I hate painting ceilings. I really do.

So with the freshly painted ceiling Aubrey was able to do the door installation and Wednesday night he sent me some photos ..... it looks amazing. I can't stop staring at the photo. I'm really, really happy with the Ikea Adel Doors. We still have to add crown molding, a valance, backsplash --- still lots to do.

Part of the reason for showing this shot is because a lot of people have commented on the exposed brick wall that has been seen in previous photos. Although it's lovely, it's not staying like this for a few reasons.

First, the other side of the kitchen doesn't have an exposed brick wall and I think it would look odd to different back splashes. Number 2 - I don't think brick cleans very well so food splatters would be hard to get off. Last - although I like the look, it's not the look I was going for. Now - that being said the interesting thing is that the soft grey of the brick has me debating whether I really want to do a white subway tile as we had originally planned. The grey looks lovely with the cabinetry. Because of this - we've decided to wait until the countertop is installed to decide on the backsplash.

Still a lot of things to do, but this shot was too fun not to share. ;) Have a lovely weekend! xo Linds

DIY kitchen curtains

With our kitchen reno plans on hold until after the baby is born and I'm back at work, I've basically been ignoring that giant eyesore of a room. Then last week Adam reminded me that it still might be nice to have some curtains on the windows.

The back of our house faces the parking lot of a small, multi-unit building. We plan to build a privacy fence that will allow us to still view the trees and water beyond the parking lot, while also enjoying all the light that our windows let in. But until we get around to building said fence, curtains are a great temporary fix. One of the windows is part of a hideous old door, so as an added bonus, the new curtain helps disguise it until we get a pretty new door later this year.

You may remember the curtain panels I purchased at Ikea several weeks ago. I turned one into a door for our basement storage room and the second panel was easily transformed into two kitchen curtains (it's basically the gift that keeps on giving).

The panel was only wide enough to use its existing top for one of the curtains, so I decided to use it for the window in the door. Once I figured out my measurements (making sure to include extra height and width for my hems and some gathering), I made several pencil marks along my fabric and used a straight edge to draw a line for cutting (obviously I struggle with cutting straight lines).


After cutting my panel to size, I measured, pinned and ironed my hems. Since I was using an existing panel, I only needed to hem two edges (one side and the bottom) and I copied the width of the existing hem so that everything matched up.


Last step: sewing. For the window above the sink, I basically repeated the steps from the first curtain, but this time I sewed a channel for my rod along the top of the panel. Again, I made sure to include several extra inches of width to allow for some gathering.

{ugly door partially hidden by a pretty new curtain}
 It's hard to see the curtain panel with all the light coming into our kitchen (a good problem to have, I know), so here's a picture I snapped at night.


{I love how the sheer panels still let in lots of light}
{The cafe rod hides the view of the parking lot, but still lets in lots of light. Sadly, it doesn't hide the remnants of my tile backsplash-removing job. I need to do something about that.}


Sure, the door's still ugly and so is our kitchen, but a little extra privacy is always nice, right?

Bookcase how-to

Yesterday I showed off my first Ikea hack and today I'm providing some more detail on how I went from this:


To this:


The first, obvious step was to buy and assemble three Billy bookcases from Ikea (the website says they're $49, but we picked them up at the Massachusetts Ikea for $39.99 each). I'd been envisioning white shelves against a black background for awhile and armed with some pinspiration, I decided to go for it.

I taped off the inside edges of each bookcase and grabbed a can of black paint I already had on hand (Sico's furniture paint in Grand Piano). But as soon as I put brush to bookshelf, I regretted it.


Sorry for the crappy photo, but the plastic-y backing basically sucked up the paint and there was zero adhesion (as in, the paint wiped right off with a dry cloth). Oops.

I immediately checked out this very helpful laminate painting tutorial from Natty by Design and went out to get some Zinsser primer. An extremely helpful salesperson at Home Hardware (I need to shop there more) recommended Zinsser's oil-based, odorless primer and after a good sanding with some 80-grit sandpaper, it worked like a charm. Once the primer was dry (another bonus - it dried in less than an hour), I went over it lightly with 220-grit sandpaper and followed that with two thin coats of my black paint (I used a foam brush for the edges and a small foam roller for the rest).


So much better than the plain white, right? And it doesn't hurt that it helps disguise our necessary-but-ugly DVD player.


Our house is a little older, so the floors definitely aren't level. Once I had the shelves where I wanted them, I had to play around with some shims until the bookcases were level and flush with the wall (this created a 1/4 - 1/2" gap between the bottom of the bookcase and the floor, which is luckily hidden by the trim). I used clamps to hold the edges of the bookcases together while I attached them permanently with several screws. I just screwed into the exisiting holes for the adjustable shelves, which worked well, just make sure your screws aren't long enough to poke through the other side (in the picture above, you can kind of see the screws in the holes directly below the shelf).

Then it was time to attach the trim. I used chair rail along the top and baseboard along the bottom. The width is entirely up to you, but I knew my baseboard needed to be at least 4 1/4" because of the gap between the bottom of the bookcase and the floor. Adam used a chop saw to cut the trim to size for me and I attached it using 1 1/4" finishing nails, making sure to pre-drill my holes first (it's helpful if you have a second pair of hands for this part, although I did it by myself). With the trim on, I filled my nail holes with wood putty and caulked all of the seams (this step hides a multitude of sins, including less-than-perfect corners).


I also caulked the seams where the edges of the bookcases met (alternatively, you could cover this part with a flat piece of trim). Once the caulk dried, I painted this part along with the trim (I had to prime the edges where the bookcases met, but my trim came pre-primed). I used a sample container of Behr's interior paint in a flat finish (apparently the sample sizes only come in flat), colour matched to Martha Stewart's Talc. I don't think it's an exact match, but as you can see in the pictures below, it's very, very close.


And that's it. The whole project cost around $175, which is significantly less than what we sold our old entertainment stand for. It could of course cost more or less, depending on which materials you already have on hand and the trim you choose (the store we bought it from only sold 8' and 16' lengths, but some places sell it by the foot).

Since these pictures were taken I've been playing around with the styling - the fun part - so expect to see some updates along the way.


Oh, and see that chair in the left-hand corner? It's my next project - stay tuned!

Billy bookcase hack

As part of our plans to re-arrange our living room, we sold our beloved entertainment stand and decided to put the money towards a new shelving/entertainment unit. Check out my first Ikea hack!


I'm pretty thrilled with how it turned out, especially because this is what I started with:


Three basic Billy bookcases from Ikea. I'll be back tomorrow with lots of how-to details and some more pretty after shots!

Turning curtains into doors or Things I bought at Ikea: Part 2

I spent most of the weekend working on a project that I can't wait to share with you - just as soon as I finish it. In the meantime, here's a much smaller project I checked off my list.

Much like our interior doors upstairs, the door to our basement storage room was a mess, so we chucked it. But as you can see in the photo below, we needed something to obscure the view.


Um, try to ignore the ugly stucco on the walls. It actually only covers a small area (thank goodness), so we're going to cover it up with pegboard to create a stylish storage area (why is it that simple projects get put off the longest?).

Anyway, on our trip to Boston I picked up a couple of inexpensive curtain panels at Ikea. Last week I bought a $6 tension rod and over the weekend I turned one of the curtain panels into a door.

TBC, as in, to be covered
I washed the panels first to allow for shrinkage, then measured the door opening and hemmed one panel using the iron-on hemming strip that came in the package. So easy. Unfortunately it probably means that we'll continue to put off organizing the storage room (out of sight = out of mind), but on the plus side, I can't wait to cover up that stucco.

Paper terrariums


When Nicole shared this gorgeous terrarium postcard set from Quill and Fox, I immediately envisioned the cute prints in frames, hanging in our bathroom. I picked up four VIRSERUM frames at Ikea last week and last night I got to hanging.

A pretty simple project - in anyone else's house - but the area above our toilet (where I hung the prints) was filled with hard-to-remove plastic wall anchors (there must have been a cabinet hanging there at some point), so I had some patching and painting to do first.


I've yet to come across an easy way to remove plastic wall anchors, so I just hammer them into the wall and patch the dent. I'm sure it's not at all what you're supposed to do, but it's easy and it works for me.


Since the mats that came with the frames were too large for the postcards, I just flipped the ad page in the frame and mounted the postcard on that. I like how the grey tint compliments the wall colour. Oh, and I lightly traced the inside edge of each mat with a black coloured pencil, just because I thought it looked better than the white on white on white.


I still need to add a few things to the tank lid to fill up the empty wall space - maybe some magazine storage? A pretty vase filled with blooms?

Here's another view - snapped while standing in front of the vanity mirror. At first I was tempted to add two more frames and call it a day, but from this view I think that would be overload (the frames are actually larger in real life if that makes sense). A few well-chosen objects would add interest (and maybe some colour) and help fill out the space. What do you think?

Total Pageviews

Blog Archive

Popular Posts