More paint problems - help!

One of the projects I quickly wrapped up before Hannah's party  (see what I did there?) was the makeover of an $8 table I bought at Value Village...in APRIL (the shame). You may remember me asking for your decorating advice here. I went with Option #1 using Rust-Oleum Painter's Touch 2X gloss spray paint in white (and a clear coat on the exposed legs).


(I so need to paint this last section of foundation!)

The legs turned out great, but the top is a different story. I'm pretty sure it's MDF and although I lightly sanded it before and in-between painting, the finish didn't turn out that great. Then it rained a lot and this happened:


Bubbles! Not the paint, the actual tabletop. I guess the MDF was still able to absorb water through the paint (which is meant for outdoor use).

So, onto plan B. I know I want to salvage it, I'm just not exactly how - any ideas?

Before & After: DIY patio


We had to scramble to finish it in time for Hannah's 1st birthday party, but our patio is D-O-N-E!
 

Adam's brother is visiting from North Carolina and we immediately put him to work (like, the morning after he arrived we surprised him with, 'let's go move some rock!'). After wetting, tamping and levelling the crusher dust one last time, we were ready to lay out the patio stones ('we' = Adam + his brother; I basically played the role of foreman from here on out). We used 18" x 18" concrete stones and spaced them ~3.25" apart (you can see Adam using a board as our spacer above). There was no real rhyme or reason to the spacing - this is just the look we liked and that made sense with the dimensions of our patio.

With our stones in place, everything was filled in with pea gravel and washed down with a good soaking from the hose.


The mini rock wall was an impromtu decision and a great way to repurpose some of the rock we dug up to build the patio (that's right, only some!). There are some nice pieces of slate in there and it's now one of my favourite parts of the patio.


The area behind the rock wall will eventually be filled in with bamboo. We've waged war on the bamboo growing in other areas of our yard, but this stuff makes a pretty good privacy screen so it's staying put. It was beaten back by our massive dirt pile, but we were able to rake the pile out and the bamboo should fill in nicely next year.


We've since added some colour with potted annuals and we've been enoying the space with some temporary furniture. Next year we'd like to add a table with benches (a possible DIY project?), and we're also talking about adding a privacy fence behind the row of cedars. Lots of decorating fun ahead, that's for sure, but for now we just love having a spot to relax outside.

And it's SO much better than what we started with, don't you think?


A long overdue patio update

Hello, long weekend! We're having a small family party for Hannah's first birthday on Monday, so we have the weekend to get ready. It's supposed to be a nice day weather-wise (knock on wood), so we're planning to have the party outside on our new patio. After we finish building it, of course ;)

I took a vacation day on Wednesday and my mom came over to watch Hannah so that Adam and I could put in a solid day's work outside. We finished digging (thanks goodness!) and were able to start spreading the gravel base. I must remember to take a picture of our new rock pile - it's less than half of what we dug up (the rest is still mixed in with the dirt), but it must be seen to be believed.

Adam improvised a tamper out of scrap wood last night and managed to spread several more wheelbarrow loads of gravel. He'll finish spreading and levelling gravel today, then he's off to pick up the patio stones. Our plan is to lay those tomorrow, then fill it in with pea stone (you can check out my inspiration for the patio here).


We'll do our best to clean up the area before Hannah's party, but I've planned a few decorations to hide the more unsightly areas (dirt and rock piles, ahem) until we can deal with them properly. My mom has been a HUGE help watching Hannah, so we've promised her first drinks when the patio is up and running. 

Happy weekend! xo

Digging a patio


Happy Monday, friends! I don't know about you, but I had one of those too-much-to-do-and-not-enough-weekend, weekends. The weather was gorgeous all weekend long, so I shouldn't complain.

As you can see in the picture above, one project we made some time for was the digging of our future patio. We weren't able to devote as much time to it as I would've liked (that Hannah's a real attention hog) and all the rocks and roots meant it was slower going than I would have liked, too (apparently I wanted this to be one of those "quick and easy" patio digs). The finished patio will be around 15.5 ft. x 9.5 ft. - small, but just big enough for us.


Sadly, this is the best 'before' picture I have. Always clean your camera lens BEFORE you take photos, people. The pavers will end right before the row of cedars, but the pea stone will extend just beyond them (if you have no idea what I'm talking about, you can see the type of patio we're building here).

Our house is on a corner lot, so our backyard faces our neighbour's parking area. While we wait for our cedars to grow, my MIL suggested installing some outdoor curtains for privacy. Brilliant, right?

via Sunset
Instead of the heavy duty poles above, I want to DIY a few portable poles like the ones Dana made for her patio lights. Ours just need to be sturdy enough to hold curtains without toppling over.

But first, more digging.

Patio mood board

Thanks to everyone who sent along warm wishes and positive thoughts for my return to work. The transition has gone smoothly so far - I even managed to get out for a run after putting Hannah to bed last night. I can't describe Hannah's excitement when I walk through the door at the end of the day, but I don't think I've ever seen her that happy and it feels pretty awesome to be the cause (Adam tells me she's been great during the day, too). Of course, we're all still figuring out our new schedules and routines (hello, pumping at work), so I really do appreciate your encouragement.

One of the projects I'm hoping to make some more progress on soon is our (future) backyard patio. I was inspired by Tracy's gorgeous backyard makeover in the May issue of Style at Home to put together a mood board. Our next step is to start digging the patio itself, so hopefully this will help inspire us through all that manual labour!


1 - Since the first moment of patio scheming, I've imagined string up lights. Without an outdoor outlet, this may not be possible, but I'm not giving up yet!

2 - I received two handmade navy blue and white striped pillows for Christmas (similar to these outdoor pillows) and I've been trying to figure out the best spot for them. They can't stay out in the rain, but they'll add some much needed style to our patio when the sun is shining.

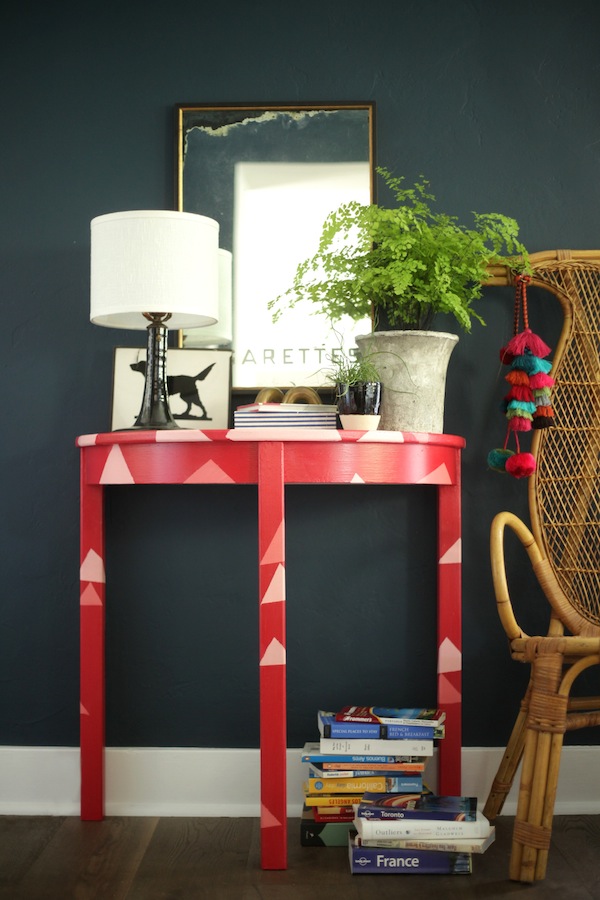
3 - Thanks to everyone who offered their two cents on my side table makeover. I'm still tempted to go bright, but I'm also drawn to the classic appeal of this West Elm version. I can see it standing the test of time, or at least my ever-changing tastes.

4 - We already own these chairs in dark brown. Someday it would be nice to upgrade to the real thing, but they do the trick for now. Plus, I like that they're lightweight, stackable and easy to clean.

5, 6 & 7 - I know I'm a little late to the party, but I'd love to try making my own DIY concrete containers for the patio. These planters are sold in Australia, but they're great inspiration. I'd love to have separate planters filled with a brightly-coloured flower like angelonia and ornamental grass. We already have lots of ribbon grass on our property, so it should be easy to transplant.

In case you missed it, you can check out my inspiration for the patio itself here.

Planting a privacy hedge


How was your weekend? We spent a lot of it outdoors, enjoying the beautiful weather and working on our future patio area. I gave our back windows a fresh coat of white paint while Adam planted a row of emerald cedars. We chose cedars for our future privacy hedge because we like the look and they grow quickly (relatively speaking; in 4-5 years we should have an impressive evergreen screen). Adam planted the shrubs ~18 inches apart and filled the holes with a mixture of dirt, compost and manure. Now we just have to remember to water them ;)

Next, we need to finish cleaning up the brush you see in the background of the first picture. It's actually a grove of bamboo that we're keeping - it offers great privacy during the summer months - we just need to clear out last year's dead stuff to make way for the new. We also need to mark the area for our patio so we can start digging. In case you missed it, you can check out my patio inspiration here.

Help me choose a makeover for this darling side table


I found this side table at Value Village yesterday for $7.99 (I went back for a table that, sadly, someone else had smartly snapped up, but this was a great consolation prize). The legs are wood, but the top looks and feels like MDF, so it needs to be painted. The plan is to use it outdoors, on our future patio. I can't decide what direction to take it in, so I've narrowed it down to a few options and I'm hoping you can help me choose.

Option 1

via

I love how my dipped chair turned out, so it could be fun to try something similar with this table. I like West Elm's crisp white version, but I could also go for a glossy green or a warm pink.

Option 2

via

via

Speaking of colour, this could be the perfect excuse to finally try the neon trend. Oh, and I'll take a pair of those chairs, thankyouverymuch.

Option 3


via


via

via

I swear I didn't purposely correspond the number of images to the option number, by the way. A good friend gave me a book on stencilling for my birthday and it has me feeling inspired to try something a little different. I'm especially digging the triangles in the first and third images.

So, there you have it. Which option gets your vote?


Patios and hedges


This post was sponsored by garage doors from garaga. All thoughts and opinions are my own.

Now that the weather is starting to improve (notwithstanding yesterday's brief hail storm), I've started thinking about outdoor projects. Aside from the usual raking and spring clean-up, we I had a handful of small projects planned for this year (edging flower beds, expanding the veggie garden, adding a new plant or two, DIY-ing a couple of window boxes, a little painting and possibly replacing our exterior light fixtures). That's until I spotted this picture in the latest issue of Style at Home:

source: Style At Home, May 2013

Don't worry, I'm not going to try growing a palm tree in Nova Scotia.

We always planned to DIY a small patio in our narrow backyard, but we were waiting until we were ready to take on some much bigger plans for the side yard next to our garage (briefly: tearing down a fence, removing the remnants of an old foundation, levelling the yard, planting grass and building a new fence). Those plans are relatively low on our priority list considering the work we still need to do inside, and we didn't want to move ahead with the patio until the new fence was in place (the plan was to extend the fence along the back of our property, giving us some privacy from our neighbour's backyard).

Both my mother and mother-in-law have suggested using plants to gain some privacy for the other, larger side yard (and both have much greener thumbs than I), but for some reason it didn't occur to me that this could also work along the back of our property. Yes, this is a long, likely confusing way of telling you that we're going to DIY a patio and plant a privacy hedge.

Here's my patio inspiration - just picture some lovely green hedges in place of those fences!

source: the brick house

source: BHG

source: jennifer's mentionables


What about you? Any big plans for your yard this year?


Total Pageviews

Blog Archive

Popular Posts