DIY chalkboard storage bins

I recently spotted this fun storage idea at Bed, Bath & Beyond, but at $55.99 it was way more than I was willing to spend on what is essentially a large wooden box.
I decided to try making something similar for the closet in our entry-way, so I picked up four plastic storage bins at the dollar store (for $2 each). They offered plenty of room to store hats, gloves, dog toys, and other random things you might need on your way out the door, and they're lightweight, so they'll be easy to move on and off the high closet shelf.


I found some chalkboard paint at my local art store, and followed the instructions on the bottle. It was super easy - just roll on a thin coat of paint, leave it to dry for an hour, then roll on a second coat of paint and let the whole thing cure for 24 hours (since I was working with plastic, I let it cure for 48 hours to be on the safe side).


Once your 24 hours is up, lightly rub some chalk on the surface, wipe it clean with a damp cloth, and you're good to go!   


I went for a messier look, but you could just as easily use tape to create a clean rectangle (or any other shape). Here's how the finished bins look in our not-yet-finished closet (more on that soon).


And here's the all-important budget breakdown.

My Top 5 We Can Do It Cheaper Copy Picks - Pick Your Favorite!

I love seeing other bloggers recreations! It inspires me to try stuff that I wouldn't normally try.
We didn't have too many linkers this time, but we do have some good ones. Here is my top five in no particular order. Leave a comment with your number 1 pick!

1. I couldn't find another picture to show her "copy" but it really does look like it jumped right out of a Pottery Barn catalog! A Creative Beginning submitted this very pretty spring mantle.
2. Inspired by Restoration Hardware, but not ready to put out the big bucks, Harbour Breeze came up with a much cheaper version using her imagination and the help of her local RESTORE.
3. A long time follower and a very sweet and creative woman submitted this look alike inspired by Pottery Barn. Click on over to Thrifty Parsonage Living to see more of what she's done!
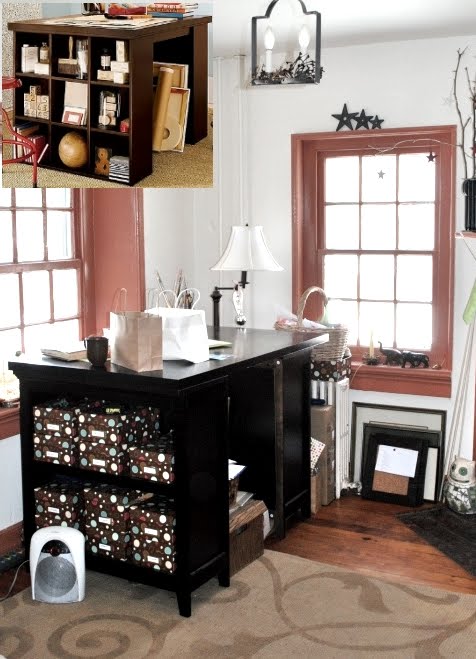
4. Not An Empty Room linked up this clever copy of a Pottery Barn desk. This is a perfect We Can Do It Cheaper project for anyone!
5. The Vintage Bricoleur decided that $45 was out of the question and came up with her own beautiful copy of a Restoration Hardware pillow.

Voting will be open till next Friday so be sure to let me know which one is your top pick!


The winner will receive a $10 gift certificate to a great Etsy store, The Snootie Pig. Be sure to check it out!


Photobucket

DIY wedding invitations


This blog is really a diary, a way to document the ups and downs as we turn our ugly house into a pretty home. But since our wedding is only a few months away, I can’t help but share a few details here.
This week Adam and I made it our mission to tackle wedding invites. We’re lucky enough to have two super-talented friends who agreed to design our wedding invitations for us. Once the design and wording was finalized (we gave them complete creative reign over the design, but I provided some wording suggestions), we took the invites to Staples for printing. We wanted to screenprint the invites - we loved the idea that each one would be slightly different - but decided to have the text printed to ensure that it was 100% legible. Adam did the screenprinting and it turned out great. The colour really pops and the paint adds a bit of texture to the invite.
The design is simple, but stylish and it perfectly suits the elegantly casual atmosphere we're going for with our backyard wedding. You'll notice that we decided to forgo any inserts, and opted instead to include the address of our wedding website, which has all the details our guests will need – where to stay, how to get around, what to do while they’re in town, etc. We've also asked our guests to RSVP by email, which I hope will be easier to keep track of than reply cards.
Adam and I are both really happy with how they turned out, and the fact that two of our closest friends designed and helped us make them is extra special.

Getting In Touch With My Inner Seamstress And My Janome Jem Gold Plus Trim And Stitch

I have failed to mention that something very special happened to me a few weeks ago.

My sewing machine quit working.

Special huh?
Well this gave me a reason to start on the fantastic hunt for a new one. After searching, asking, getting frustrated and so much more, I settled on this one.
To say that I have fallen in love is an understatement. I'm not sure if I love it so much because it just does what I ask it to do, or for the fact that it's a new machine and my old one was probably considered an antique.

This is a Janome Jem Gold Plus Trim and Stitch, which means it has a simple little attachment so that you can make it do light serging. Cool huh.

Anyway, this has opened new windows for me as an acclaimed seamstress. I plan on going places with my talent now!
Just kidding, but I have managed to whip some things up so far.


One of my nieces had a very special birthday and I wanted to make her something. Not sure that it's special, but now she knows I'm still alive and I think of her:-)
I'm not sure if this little dress is coming or going. Originally I made it for my newest niece, but it didn't quite turn out as I had hoped. We'll see...
Making flowers is snap now and I'm having fun putting them on everything! (I'm trying to avoid embellishing my boys clothes with them so far)

Now I just need to clean up the huge mess that I tend to make whenever I sew.

Scratch that, tornado sirens going off again. *sigh* Living in Texas is never boring!
Photobucket

Finding my green thumb

We've had what feels like endless days of rain and grey skies here in Halifax, so I'm glad we took advantage of some brief weekend sunshine and started work on our lawn. Because "progress" depends on what you're starting with, here's what our lawn looked like on closing day in early March:


Lots of potential for sure, but a few years of neglect left us with a bit of a mess. Now that spring is here, new plants are popping up everywhere and we're enjoying the process of "discovering" our landscape. It turns out we've got a lot to work with - we *just* need to clean things up, move a few things around, and add some plants for privacy and year-round interest.

The first, biggest, and definitely most exhausting job was banishing the bamboo along the front of our property. It was bamboo-gone-wild up there. We did our best to dig up the roots (and there were some real doozies), but we know we're in for a long battle (I've already been out in the yard cutting back new shoots since these photos were taken). Believe it or not, this giant pile is only half of the crap we raked and dug out of the front bed:


And here's the lovely open space left behind, ready for new planting:


So far, we've discovered that we have lots of herbs - like chives, thyme and sage - as well as some ground cover, tulips, hycinthes, lillies, roses, ornatmental grasses and hostas galore. We've also got a few of these mystery plants - any idea what they are?


We're still waiting to see what the yard looks like when all of our plants have grown in, but we're hoping to plant at least a few shrubs and evergreens this year (we figure the sooner they start growing, the better). We started with a couple of rhododendran bushes - a plant we both love and knew we wanted to have in our yard before we even had one. I planted one rhodo in the front bed:


And another around the side of the house, facing the largest section of our lawn. Wouldn't it be nice if they grew this big?


A girl can dream. For now, I'm just hoping I don't kill them haha. We also planted a couple of green mountain boxwood shrubs, which will (hopefully) grow to be about 2-3 feet wide and 3-5 feet high (as you can see in the photos below, there are still a few clumps of grass and weeds that need to be pulled out).


Finally, we planted a couple of golden euonymus shrubs - one in the front bed and another around the side of the house. They can grow up to 6 feet high and 5 feet wide, and I pretty much love, love, love the colour.


Here's a blurry shot of the whole bed (well most of it anyway), taken in the midst of this week's rain:


And here's the side of the house that was formerly without plants, and is now home to my baby rhodo and euonymus shrub. I still need to plant a baby forsythia bush - a gift from my mom - which should eventually grow to be around 4-6 feet high and 3-5 feet wide. I'm thinking about planting it around the side of the house - already home to my baby rhodo and euonymus shrub - and then I'll fill the whole thing in with a few evergreens (I'm planning to add an evergreen or two to the front bed, too). Pictures to come if it ever stops raining.

Landscaping is all about patience, since plants take awhile to grow (duh). But we're having fun figuring it out and I can already tell that we're going to have a great time "greening" our space in the years to come. Mowing the lawn on the otherhand...stay tuned.

Total Pageviews

Blog Archive

Popular Posts